
You're standing on a step stool on Saturday morning, looking at an old ceiling box with bare wires poking through it. The new ceiling fan with light is still in its carton on the floor, and the obvious temptation is to remove the old fixture, connect the matching colors, and be done before lunch.
That approach skips the part that causes the most serious failures. A ceiling fan with light isn't only a fixture replacement. It adds rotating mechanical load, vibration, structural demands, and more than one electrical function to a ceiling opening that may have been installed only for a lightweight lamp. The wiring matters, but the box behind the ceiling matters just as much.
Table of Contents
- What You Are Actually Signing Up For
- Tools, Materials, and Pre-Flight Safety Checks
- Removing the Old Fixture and Upgrading the Ceiling Box
- Mounting the Fan Bracket, Motor, and Light Kit
- Wiring the Switch Leg, Neutral, and Smart Controls
- Power-On Testing, Balancing, and Breaking In the Fan
- Mistakes That Should Send You to a Licensed Electrician
What You Are Actually Signing Up For
The cleanest way to think about how to install ceiling fan with light is to divide the job into four checkpoints:
- Support: The ceiling box must be listed for fan support and securely attached to framing or an approved brace.
- Conductors: You must identify the hot, neutral, ground, and any separate switch leg instead of trusting wire color alone.
- Isolation: The breaker must be off, and the wires must be tested dead at the ceiling.
- Clearance: The finished fan must suit the ceiling height, room layout, slope, and blade sweep.
If any one of those checkpoints fails, the project changes. You might still be doing a fan installation, but you're no longer doing a simple fixture swap.
The National Electrical Code was first published in 1897, and responsibility for periodic revision moved to NFPA in 1911. Under the 2020 NEC, ceiling outlet boxes in habitable rooms where a fan may be installed must either be listed for sole fan support or provide access to structural framing capable of supporting the fan bracket. The 2026 NEC clarified requirements for centrally mounted ceiling boxes in living and sleeping areas, reflecting the difference between supporting a basic light fixture and supporting a combined fan-and-light assembly. The NFPA explanation of the National Electrical Code provides the broader code context.
The scope depends on what's behind the ceiling
If a listed fan-rated box is already solidly mounted and the existing wiring is suitable, a first-time installer may spend 2 to 4 hours on the work. That estimate is a planning guide, not a guarantee, and it assumes the ceiling box doesn't need structural repair.
Replacing the box can turn the job into a much larger project. An expandable brace may be installed through the existing opening, but awkward framing, plaster, insulation, or limited ladder access can make the work slow and unsafe. Access from above may require attic work, while a finished upper floor can make a professional installation the more practical choice.
The fan itself may cost about $90, a brace box may cost $15 to $40, and a licensed electrician may charge $250 to $450 for the installation, depending on access and local conditions. These figures come from the project brief rather than a universal price schedule, so treat them as rough planning ranges only.
Practical rule: If you can't prove that the box is fan-rated and structurally secure, you don't yet have a place to hang the fan.
Know the safety stops before opening the box
Stop and arrange professional help if you find aluminum branch wiring, no grounding conductor, a shared neutral circuit, or heat-damaged insulation. A ceiling higher than 9 feet may also require a different downrod plan, and a steep or angled ceiling may need an approved mounting adapter.
The history of the product explains why these checks matter. Electrically powered ceiling fans date to 1882, and light kits were later attached to fans. By the 1910s, fans were already being fitted with light kits and four blades, creating the basic combined format used today. The Electrical Safety Foundation International's fan safety guidance also cites U.S. estimates of about 3,900 annual home-structure fires per year from 2006 to 2010 involving fans, along with electrocution estimates involving air conditioners and fans. Those figures aren't a prediction for your installation, but they show why a spinning fixture shouldn't be treated like an ordinary lamp.
Tools, Materials, and Pre-Flight Safety Checks
Put the tools on the floor before you touch the breaker. Ceiling work becomes unnecessarily risky when you're balanced on a ladder while searching for a screwdriver or trying to hold a motor with one hand.
You'll want a non-contact voltage tester, multimeter, lineman pliers, wire strippers, a 4-in-1 screwdriver, and a socket set. Include a 9/16-inch and 11/32-inch deep socket if the brace or mounting hardware uses lag screws. Use a ladder rated for the ceiling height, and have another person available to support the motor while you make the connections.
The materials should match the fan and the framing, not just the hole in the ceiling:
- Fan-rated support: Use a listed pancake box attached to framing or an expandable fan brace designed for the joist arrangement.
- Mounting hardware: Use the fan-rated mounting bracket and support screws supplied or specified by the manufacturer.
- Connectors: Select wire nuts rated for the conductor type and number of wires being joined.
- Height hardware: Choose a downrod that matches the ceiling height and the fan manufacturer's instructions.
- Protection: Keep electrical tape available, but don't use tape to compensate for a loose or improperly sized connector.
Test the circuit, then identify the conductors
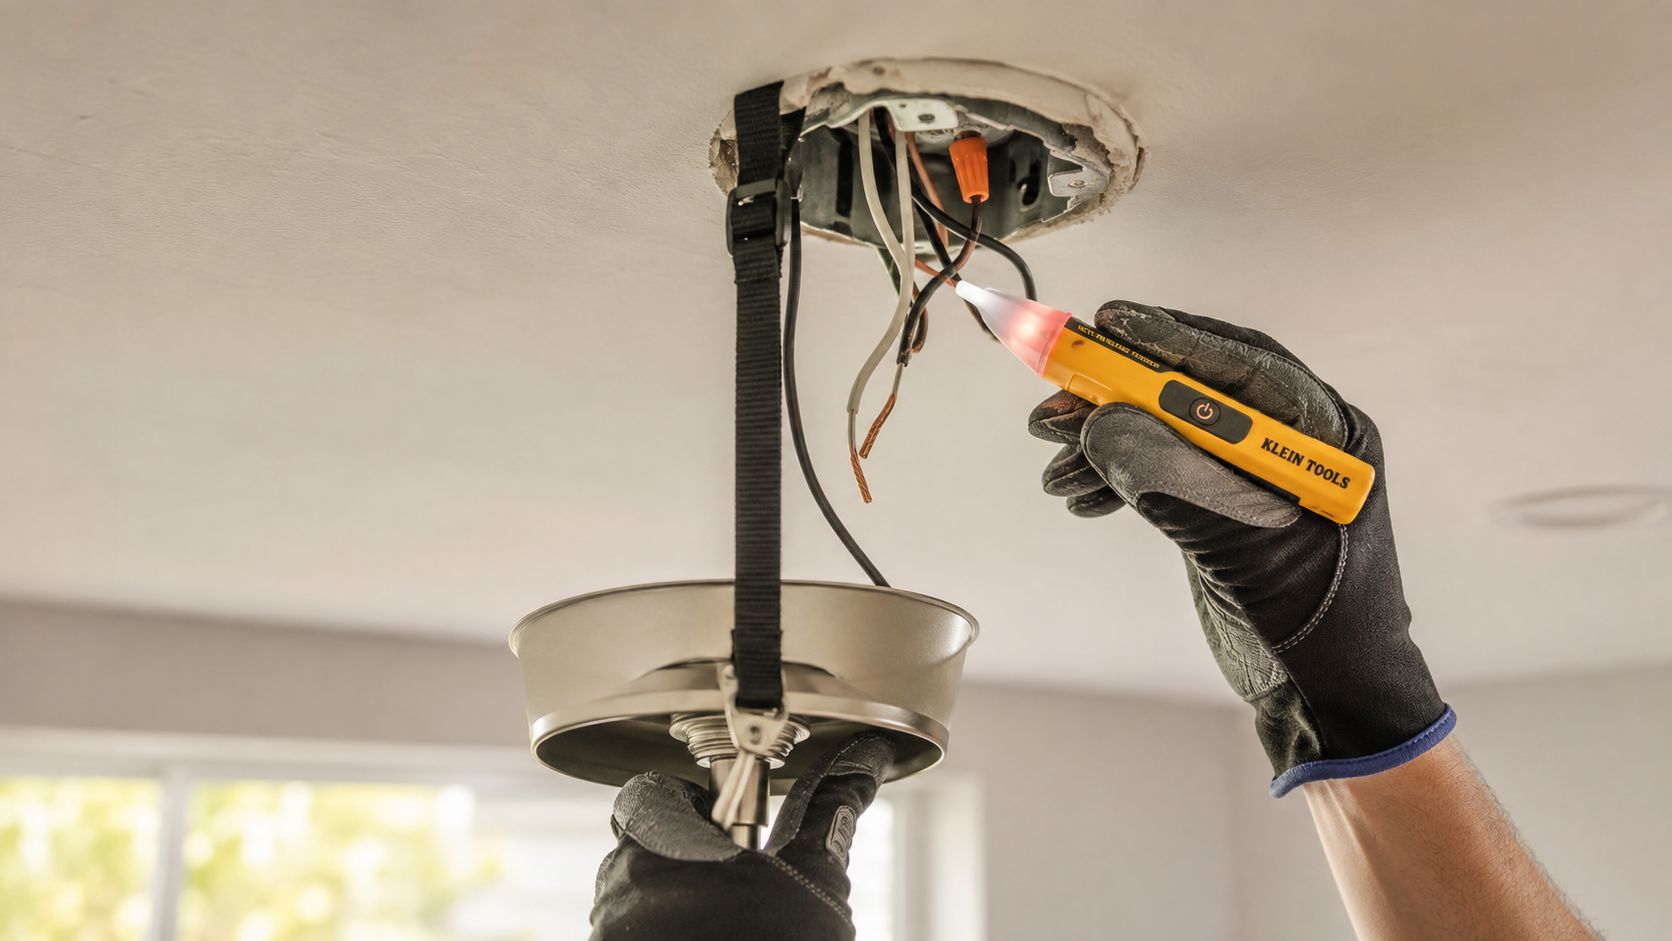
Turn off the breaker, not only the wall switch. Test the ceiling conductors with a non-contact tester, then confirm the result with a multimeter when conditions or wiring make the tester's reading uncertain. A wall switch can interrupt one conductor while other wires in the ceiling box remain energized.
At the ceiling, identify the line hot, neutral, ground, and switched leg. Wire color is useful, but older work and previous alterations can make color an unreliable substitute for testing. Take a clear photograph before disconnecting an existing fixture, but use the photograph as a reference, not as proof that the old connections were correct.
Check the box marking before you plan the rest of the installation. A box intended for a light fixture isn't automatically suitable for a fan. If you can't find a marking that identifies it as acceptable for fan support, treat it as a replacement item.
Check the room and the wall control
Look at the joist direction and the distance from the ceiling opening to nearby walls. Blade tips need room to sweep without contacting a wall, cabinet, beam, or adjacent fixture. Confirm that the bracket can sit flat and that the fan's downrod or flush-mount canopy matches the ceiling geometry.
If you're installing a smart control, inspect the switch box before buying into that plan. Some receivers and smart controls require a neutral at the switch box, not merely at the ceiling. A missing neutral can force a different control arrangement or require additional wiring.
For a broader review of the home's electrical condition, use this home electrical inspection checklist.
Stop-work rule: Aluminum wiring, charred insulation, an absent grounding conductor, or a shared neutral circuit means the project has stopped being a Saturday DIY job.
Removing the Old Fixture and Upgrading the Ceiling Box
Start with support, not speed. After switching off the breaker, verify the fixture wires are dead with the tester. Keep one hand on the fixture or have a second person support it so its weight never hangs from the conductors.
Remove the canopy or fixture base carefully. Photograph the connections while they're still intact, then separate the hot, neutral, ground, and switched leg one at a time. Cap or secure loose conductors as needed while you inspect the ceiling opening. Don't pull on a wire to make room for the fixture unless you know how it's secured and where it runs.
Inspect the box before deciding the job is simple
Look for a clear marking such as “Acceptable for Fan Support” or equivalent manufacturer labeling. A standard round or octagonal box installed for a light fixture isn't enough just because it feels solid when you tug on it. A fan creates dynamic rotating loads, and the support system must be listed for that use.
Under NEC-based guidance, a sole-support box cannot carry a fan heavier than 32 kg, or 70 pounds. Boxes intended for fans over 16 kg, or 35 pounds, must show the maximum supported weight on the marking. Check the fan's total installed weight, including the light kit, rather than weighing only the motor housing. The NEC fan-support guidance explains the support thresholds and marking requirements.
A modern integrated fan and light can approach the upper end of the weight a light-duty box was never designed to carry. If the existing box has no fan-support marking, replace it before attaching the new bracket.
Choose and install the brace
A pancake box can work when it's screwed directly to a suitable brace or framing member. An expandable bar brace is useful when the joists are accessible only through the existing ceiling hole. Follow the brace manufacturer's instructions, and make sure the brace bears on framing rather than merely gripping thin ceiling material.
Work the brace through the opening, position it across the joists, and secure it so the box sits flush with the finished ceiling. Feed the conductors into the box without pinching them. When the mounting screws are snug, hold the box and try to rotate it by hand. It shouldn't twist, shift, or pull away from the ceiling.
If the box won't sit flush, the brace doesn't engage solid framing, or the opening is too small for safe installation, stop cutting and reassess. A larger hole can create a ceiling repair problem, while an unsecured brace creates a fan-support problem.
Confirm the finished clearances
Before lifting the fan, compare the manufacturer's requirements with the room. Keep the blades at least 7 feet from the floor, at least 18 inches from any wall to the blade tip, and don't mount the fan directly to a ceiling steeper than 34 degrees without an angled mounting kit.
These clearances aren't decorative preferences. They reduce contact risk, keep the blade sweep clear, and help the fan hang in a stable position. If the room can't meet them, choose a different mounting method or a different fan rather than forcing the installation.
Mounting the Fan Bracket, Motor, and Light Kit
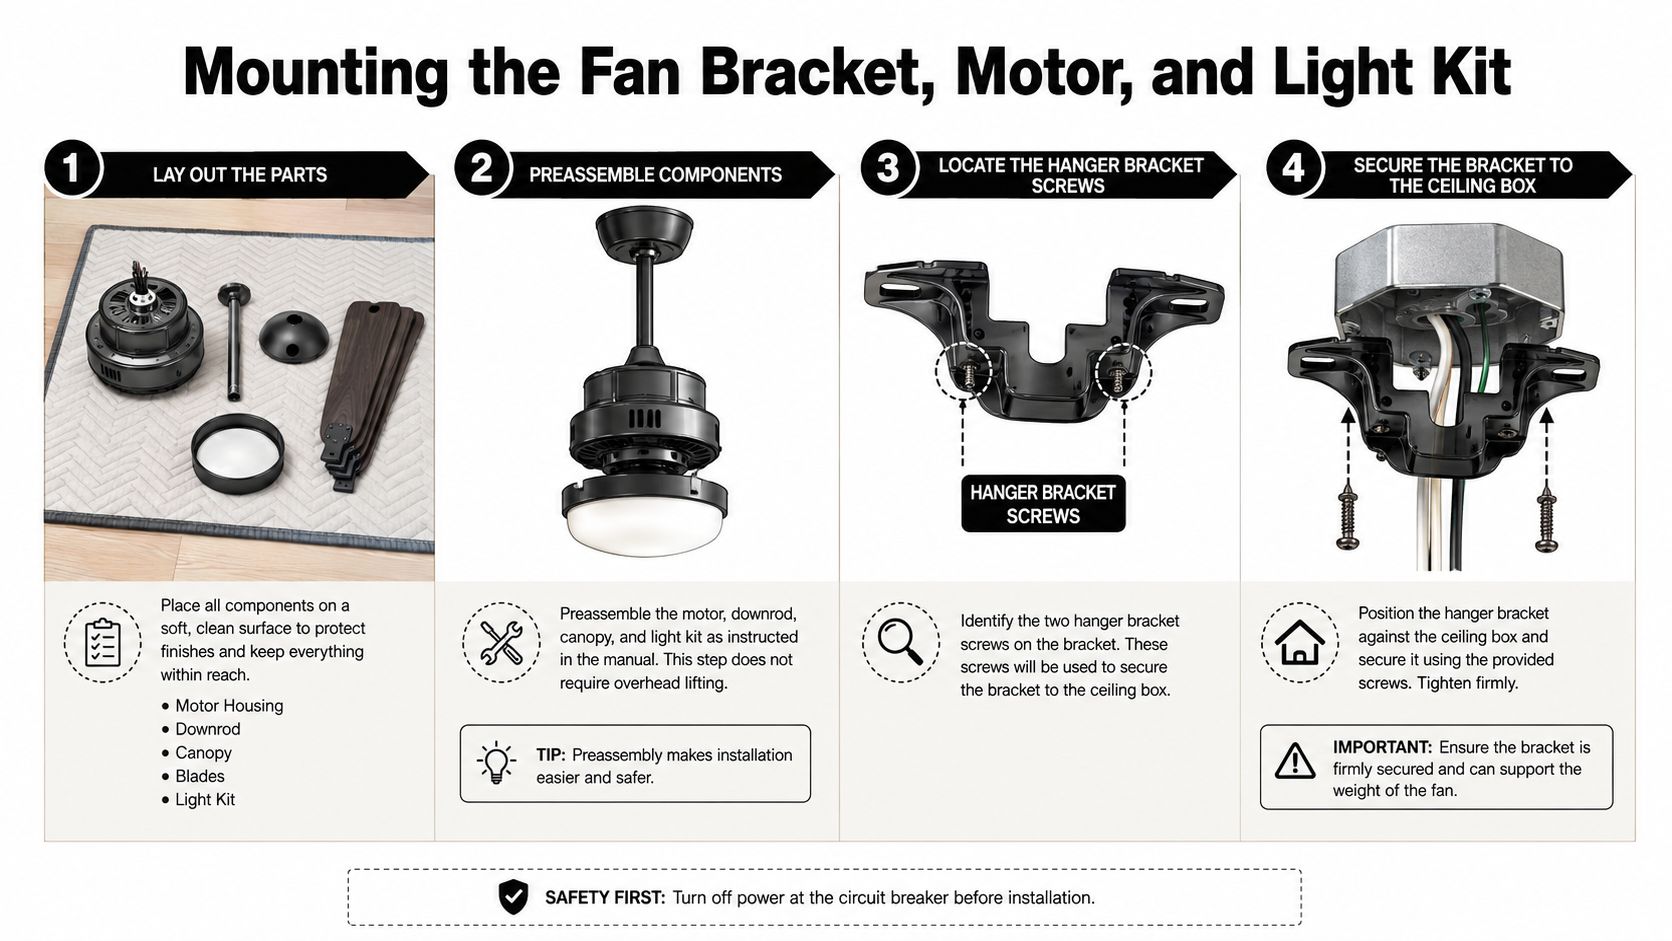
Lay the motor housing, downrod, canopy, blades, and light kit on a padded floor. Most of the work should happen there, where you can see the hardware and keep both feet planted. Read the manufacturer's assembly sequence before tightening anything, because the order of the downrod, canopy, and yoke hardware varies by design.
Attach the downrod if the fan uses one. Install the locking pin, secure its retaining clip, and tighten the yoke setscrew firmly. The pin carries the hanging connection, while the setscrew helps prevent movement at the motor yoke. A loose connection can create a click, wobble, or more serious instability after power is restored.
Secure the bracket before lifting the motor
Feed the ceiling conductors through the center opening of the fan-rated bracket. Use the correct screws for the listed support box, and tighten them evenly until the bracket sits flat and doesn't move. Don't substitute ordinary wood screws or rely on decorative canopy screws to carry the fan.
Many brackets include a hook or temporary hanging feature. Hang the motor from that point so both hands are free for wiring. If the bracket has no hanging hook, have a second person support the motor continuously. Balancing the motor on a ladder while twisting wire connectors is a poor trade-off between speed and control.
Homeowners who are comparing ceiling electrical work with other overhead projects may find this explanation of when to hire an electrician for recessed useful. The same practical question applies here: if you can't safely access the work area, support the fixture, or verify the existing wiring, the task has exceeded a basic fixture replacement.
Assemble the blades and light kit methodically
Seat each blade's rubber grommets flat against the blade arms. Install the blade screws evenly, and don't leave one blade loosely attached while you move to the next. The arms should sit in the same orientation, with no blade rubbing the motor housing or canopy.
Connect the light kit's plug-in connector only after confirming that it matches the fan's wiring harness. Secure the light kit to the fan body with the supplied hardware. Leave bulbs and glass shades until the canopy is flush and the mechanical assembly is stable. That reduces the chance of breaking a shade while you're handling the fan overhead.
Before releasing the motor from the temporary hook, confirm that the downrod pin, retaining clip, yoke setscrew, bracket screws, and wire connections are all in place. The canopy should hide the connections without crushing them.
Wiring the Switch Leg, Neutral, and Smart Controls
The wiring layout depends on the wall control already in the room. Don't connect by color alone, and don't assume the wire labeled for a light in a previous fixture is still used the same way. Test the conductors at the ceiling, then match them to the fan manufacturer's diagram.
A typical fan with light has a line hot for the fan, a neutral return, a grounding connection, and a separate light lead when the wall control provides independent operation. Some systems use a receiver that accepts one supply and sends commands to the fan and light electronically.
Compare the common control arrangements
| Configuration | Hot Wire | Neutral | Switch Leg to Light | Common Pitfall |
|---|---|---|---|---|
| Single wall switch | One switched hot supplies the combined control | Neutral connects at the ceiling fan | Light is controlled through the fan's receiver or shared switch arrangement | Expecting separate wall control without a second switched conductor |
| Dual wall switches | Supply hot feeds the switch arrangement | Neutral remains connected at the fan and may also be needed at the control | Separate switched conductor operates the light lead | Connecting both fan and light to the same switched leg |
| Smart or remote receiver | Line hot feeds the receiver or control system | Receiver and control requirements must match the wiring diagram | Receiver sends the light command to the light lead | Installing a control that requires a switch-box neutral where none exists |
With a single switch, the fan and light may be controlled together or through a receiver. With dual switches, one switched conductor generally serves the fan function and another serves the light function, but the exact colors and terminals depend on the product diagram. Smart and remote systems can simplify wall switching, but they add a receiver and create another point where an incorrect connection can leave the light stuck on or the fan unresponsive.
Make each connection secure
Join the household line conductor to the fan's line lead, the neutral to the fan neutral, and the grounding conductor to the fan and bracket grounding points as shown by the instructions. Connect the light lead only to the switched conductor or receiver output intended for the light. Tighten wire nuts clockwise, then tug each conductor individually. A wire that pulls free hasn't been secured, regardless of how neat the connector looks.
Push the connections carefully into the bracket cup or box. Keep the receiver positioned as directed, and avoid pinching wires between the canopy and the bracket. Exposed copper, strained leads, and loose connectors can cause intermittent operation or vibration noise.
For related electrical protection terminology, review this explanation of what a ground-fault circuit interrupter is. It won't replace the fan manufacturer's wiring diagram, but it can help clarify the role of circuit protection in residential electrical work.
A two-pole switch is a different device and isn't automatically the answer for a fan and light. If you're unsure about switch terminology, this guide on when to use a 2 pole switch can help you distinguish switch functions before changing the wall control.
Power-On Testing, Balancing, and Breaking In the Fan
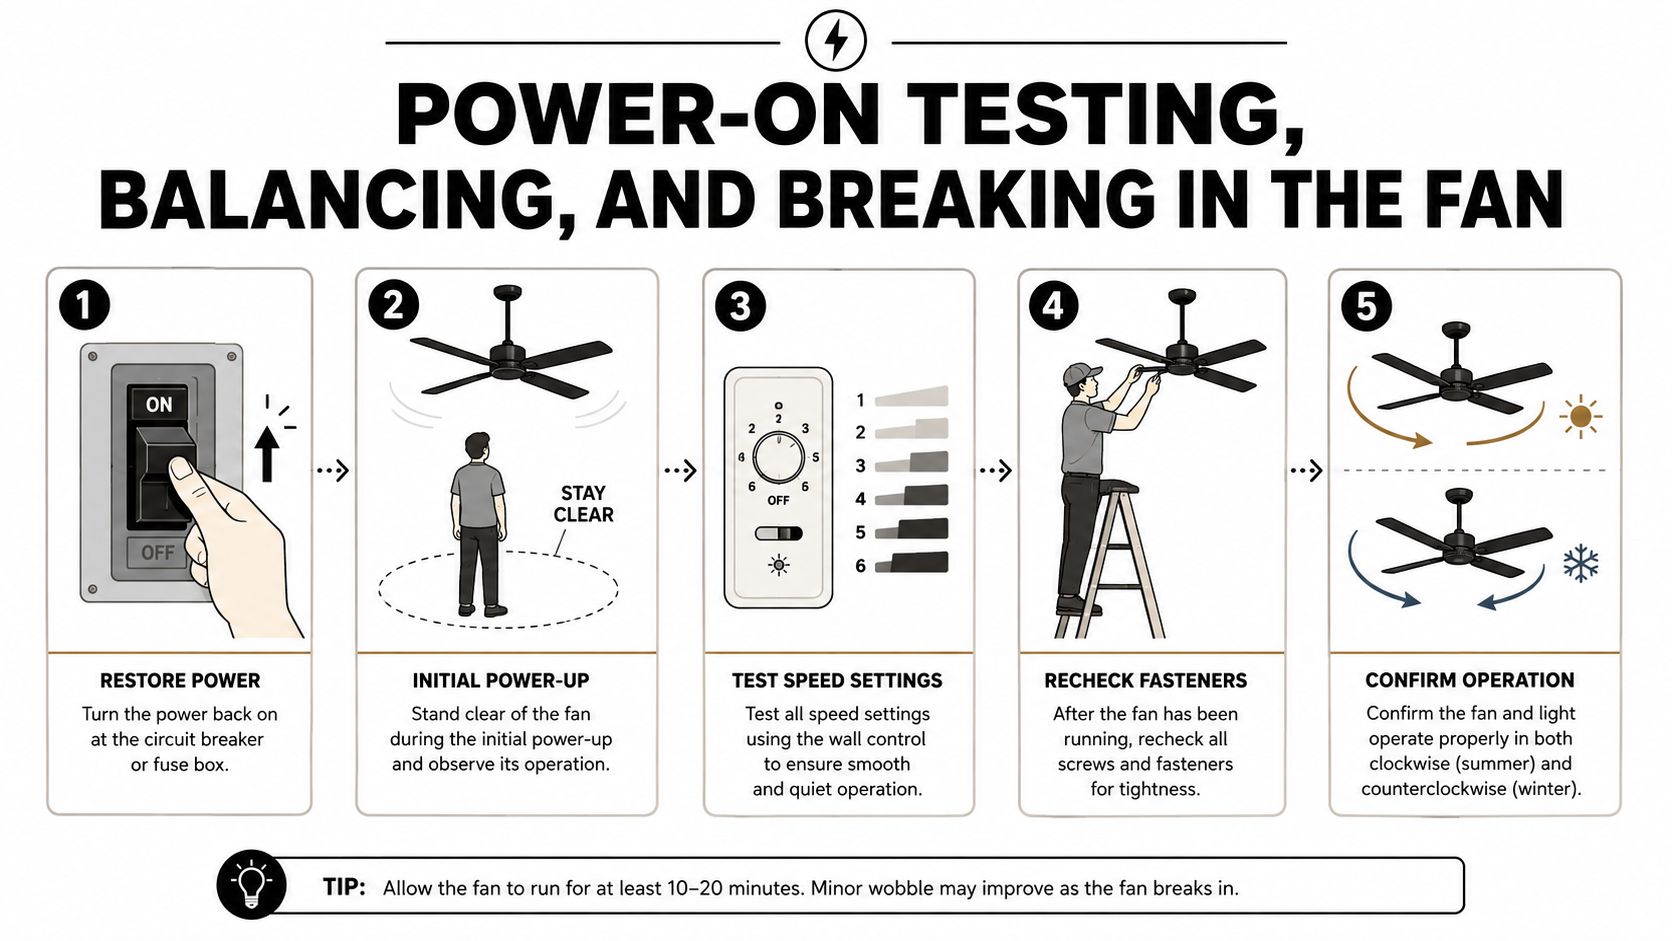
Once the canopy is secured and the blades are installed, clear the area below the fan. Restore breaker power while standing away from the blade sweep, and test the wall control before climbing back onto the ladder. Check each available fan speed and operate the light separately if the control layout is designed for separate operation.
Listen before adjusting. A hum can indicate a loose wire nut, an incorrect neutral arrangement, or a control that isn't compatible with the fan motor. A clicking sound can point to a loose downrod pin, loose blade hardware, or a blade arm installed in the wrong orientation. Turn the breaker off before touching any fastener or opening the canopy again.
Correct wobble in the right order
A slight wobble doesn't automatically mean the motor is defective. First, turn the breaker off and check that every blade screw and blade-arm screw is tight. Look across the blade tips with a straight reference, such as a yardstick, to identify a blade that sits higher or lower than the others.
If one blade is clearly high, swap it with the blade directly opposite and retest. Use the supplied balancing kit only after that basic adjustment. The kit can correct small differences, but it won't repair a bent blade, a loose arm, or a bracket that moves at the ceiling.
Run the fan at the speeds permitted by the manufacturer and observe the canopy, downrod, and blade sweep. The box and bracket should remain still while the blades rotate. Any movement at the ceiling is a support problem, not a balancing problem.
Allow the installation to settle
Many installation manuals use a 24-hour break-in period as a practical benchmark for new-fan noise. The manufacturer troubleshooting guidance recommends checking connections, fasteners, and motor-housing hardware when vibration or noise appears, and notes that some new-fan sounds diminish during that period.
Let the fan operate under observation, then recheck accessible fasteners with the breaker off. A ticking sound usually calls for checking blade screws, blade arms, or the downrod pin. A steady hum deserves an electrical and control check, especially if the light works but the motor behaves abnormally. Never treat a burnt smell, sparking, or movement at the ceiling as a normal break-in symptom.
Mistakes That Should Send You to a Licensed Electrician
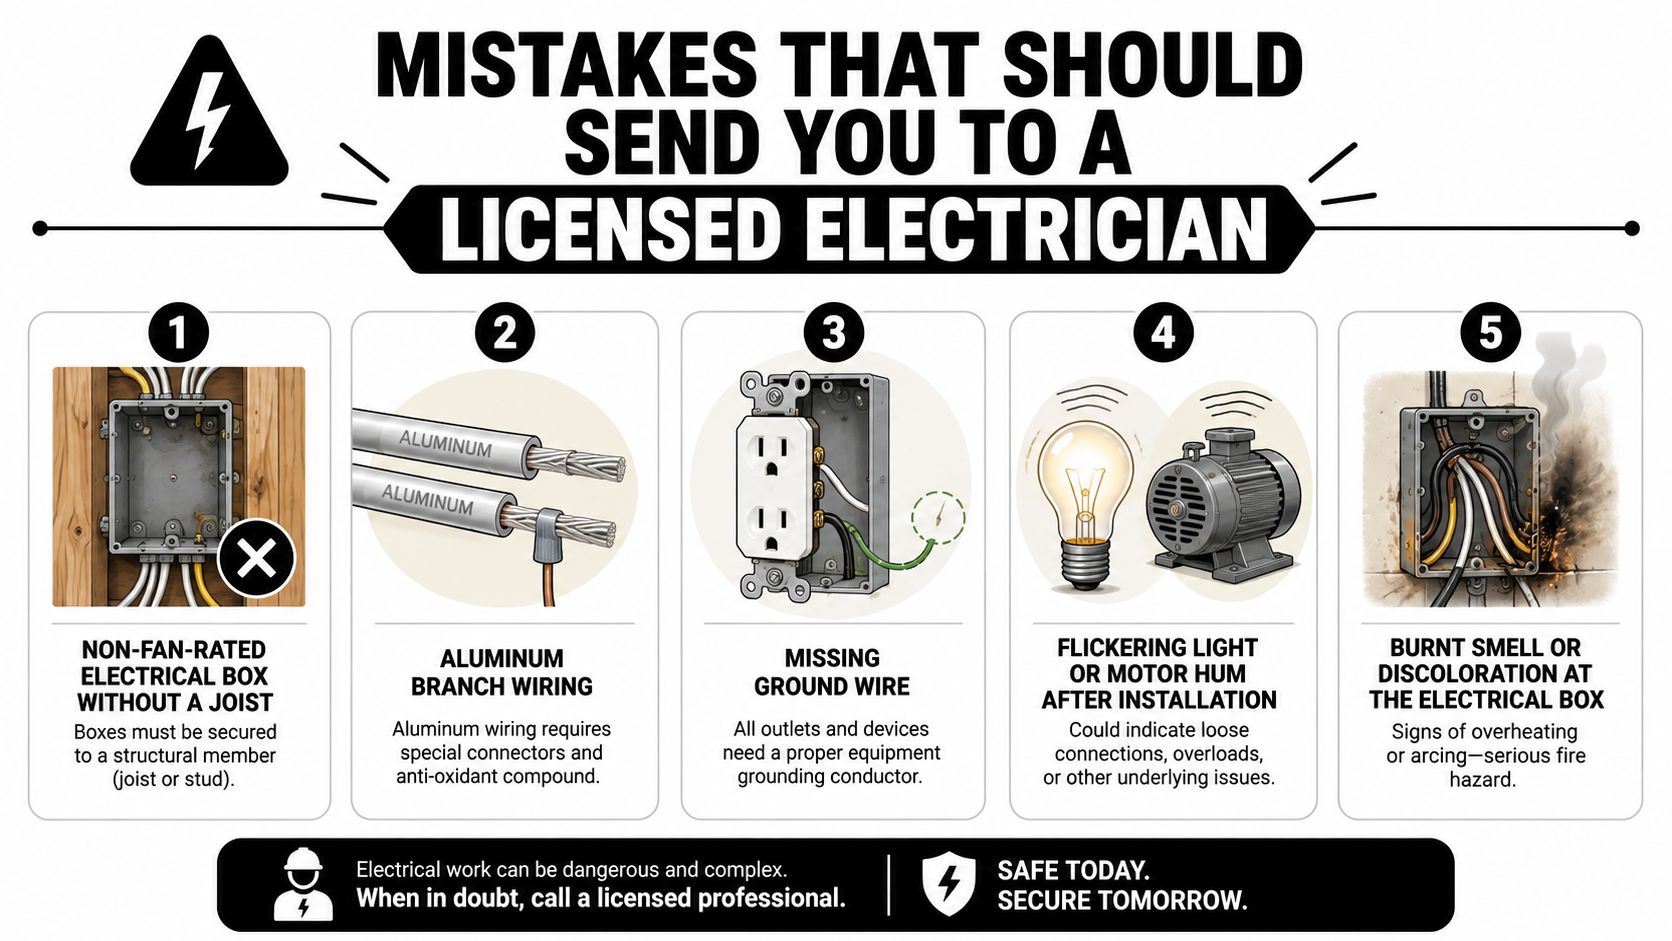
The most expensive mistake is deciding that every ceiling box can be made suitable by tightening the bracket harder. A standard light-duty box may hold a stationary fixture while failing under the weight and vibration of a fan. If the box isn't listed for fan support and you can't install an approved brace securely to framing, stop before the motor goes overhead.
The relevant code issue is NEC 314.27, which addresses outlet boxes used for ceiling-suspended fans. The practical consequence is straightforward: an inadequate box can loosen, damage the ceiling, or allow the fan to fall. A professional can determine whether the existing opening can accept a listed brace or whether the ceiling requires a different repair approach.
Wiring conditions that change the job
Aluminum branch wiring is another stop sign. Aluminum conductors require connection methods and compatible devices intended for that conductor material. Improvised connections can overheat, and NEC 110.14 governs the suitability of electrical connections and terminals. If you find aluminum conductors, don't rely on a standard copper-only connector or a previous installer's workaround.
A missing grounding conductor also changes the decision. The fan may appear to operate without a ground, but operation isn't proof that the installation is safe or compliant. Scorched insulation, brittle wire jackets, discoloration, or a burnt smell indicate that the existing connection has already experienced heat or fault conditions.
A smart control with no neutral at the switch box can require a different control, new wiring, or another approved arrangement. A shared neutral circuit deserves the same caution because changing connections without understanding the circuit can create an unsafe or confusing result. These aren't small inconveniences to solve by guessing at the ceiling wires.
Use a calm readiness test
Before you climb the ladder, answer these questions:
- Is the support verified? Is the box clearly listed for fan support, and is it secured to framing or an approved brace?
- Is the wiring suitable? Are the conductors free of aluminum compatibility concerns, heat damage, and missing grounding?
- Is the control understood? Do you know whether the room uses one switch, separate switch legs, or a receiver, and have you confirmed the required neutral?
- Does the ceiling work for the fan? Will the completed installation meet the required floor, wall, and slope clearances, or does a ceiling above 9 feet call for a different downrod plan?
If all four answers are clear, the installation may be within your abilities. If even one answer is uncertain, booking a licensed electrician before the bracket goes up is usually cheaper and safer than correcting a fallen fan, damaged ceiling, or overheated connection later. Lighthouse Energy Services' guide on how to find a good electrician offers practical selection guidance when you need qualified help.
Lighthouse Energy Services handles ceiling fan and appliance wiring, installations, repairs, and emergency electrical troubleshooting for homes and businesses in Palm Beach County, with licensed electrical professionals available around the clock. Visit Lighthouse Energy Services to request help verifying the ceiling box, wiring the fan and light, or completing an installation that has moved beyond a safe DIY project.