
You're standing in the garage with a sauna kit open on the floor, a roll of wire in the corner, and a heater that looks simple enough to hook up. Then you spot the included cord or the assumption that a nearby outlet will somehow carry the load, and that's where a lot of first-time sauna installs go wrong. A sauna electrical installation is usually a dedicated, hard-wired, continuous-load job, not a plug-in accessory exercise, and the difference matters before a single wire gets landed.
The cleanest way to avoid expensive rework is to start with the heater, not the room. Traditional home sauna heaters commonly need 220 to 240 volts, a 30 to 60 amp dedicated circuit, and hard-wiring rather than a standard receptacle, because the heater is treated as a continuous load and the circuit is commonly sized at 125% of rated amperage under NEC-based guidance, while smaller infrared units still need dedicated protection even when their draw is lower. You can compare sauna styles and layouts before you plan the electrical side by looking at home and commercial sauna options.
Table of Contents
- Before You Touch a Wire, Understand What a Sauna Really Needs
- Sizing the Circuit, Breaker, and Wire from the Nameplate
- Running Power from the Panel to the Sauna Room
- GFCI, Disconnects, and the Protection Stack
- Controls, Lighting, and Ventilation Wiring
- Permits, Inspections, and When You Must Hire a Licensed Electrician
- Your Sauna Electrical Project Checklist, Costs, and Timeline
Before You Touch a Wire, Understand What a Sauna Really Needs
You can spot the mistake fast. The box is in the garage, the bench kit is stacked by the wall, and the electrical plan still assumes the nearest outlet can carry the load. That shortcut is the one I see most often, because a sauna heater is not a lamp or a portable appliance. It is a fixed heating load, and it needs its own circuit back to the panel.
Traditional heaters and infrared units are not wired the same way
The two broad categories change the job in different ways. Traditional rock-and-steam heaters usually sit in the 220 to 240 volt range and need a dedicated hard-wired feed sized for continuous operation. Smaller infrared units can draw less, with examples around 1.4 to 1.8 kW for a two-person unit and up to 3.5 kW or less for a four-person unit, but they still typically need a dedicated circuit and proper protection. Those numbers matter because they tell you whether you are dealing with a fairly stout branch circuit or a smaller load that still cannot be treated casually. The source guidance on sauna essentials lays out both the voltage expectations and the lower-draw infrared examples in one place, which helps when homeowners compare layouts and electrical requirements before they buy anything else, especially if they want to explore home and commercial saunas.
Practical rule: If the heater is not meant to live on a dedicated circuit, it probably is not the right heater for a permanent home sauna.
The mindset shift is simple. The electrical job starts at the panel, not at the room, and it ends only when the heater, controls, and protection devices all match the manufacturer's instructions and local code. If you are still deciding between sauna styles, the right question is not just how the room will look, it is how the heater will be fed, isolated, and protected.
A quick reality check before you buy wire
If you have not looked at the heater nameplate yet, stop there. That label tells you the voltage, amperage, and often the control requirements, which drives everything else. Guessing at this stage usually means buying the wrong breaker, under-sizing the conductors, or discovering too late that the unit needs more than a simple receptacle feed.
The practical takeaway is blunt. A sauna hookup only looks simple after you have confirmed whether it is a larger fixed heater or a smaller infrared unit, because the circuit strategy changes with the load, not with the square footage of the room.
Sizing the Circuit, Breaker, and Wire from the Nameplate
Start with the heater label, because that's the only place the actual electrical demand lives. If the nameplate gives kilowatts, convert it to amps by dividing watts by volts, then apply the 125% continuous-load factor that's commonly used in NEC-based sizing. A 6 kW heater on 240 volts, for example, is roughly 25 amps before the continuous-load adjustment, which pushes the circuit sizing upward rather than downward. The point isn't to do clever math, it's to land on a breaker and conductor that won't be stressed by normal sauna operation.
Match the breaker and copper size to the load
Specialist guidance places typical sauna heater supply at 220 to 240 volts and about 30 to 60 amps, with wire sizing commonly scaled to the load, around #10 AWG for 30 amps, #8 AWG for 40 amps, and #6 AWG for 50 to 60 amps. Those are practical benchmarks, not permission to ignore the heater manual or local code. If the manufacturer specifies a different conductor or breaker arrangement, that instruction controls.
| Sauna Heater Circuit Sizing at a Glance | ||
|---|---|---|
| Heater Amps | Breaker Size | Copper Wire (AWG) |
| 30 A | 30 A | #10 |
| 40 A | 40 A | #8 |
| 50 to 60 A | 50 to 60 A | #6 |
The temptation on a DIY job is always to shave the cost by rounding down the breaker. That's the wrong move. A breaker protects the conductor, not the heater wish list, and under-sizing or “making it work” can create nuisance trips or a fire risk if the conductor isn't matched to the load.
Buy to the nameplate, not to the guess
A homeowner often asks for the “standard sauna breaker,” but there isn't one. The only correct answer is the one that fits the specific heater nameplate and passes local inspection. That's why the final wire size, breaker type, and conduit choice should be locked in only after the actual heater model is known. If the nameplate says one thing and the instructions say another, the manufacturer wins unless local code is stricter.
Bottom line: order the breaker, wire, and conduit for the heater you own, not for the heater you think you're probably buying.
Running Power from the Panel to the Sauna Room
The rough-in is where a lot of sauna projects go sideways, because the cable path gets treated like ordinary house wiring. It isn't. The run from the consumer unit or panel to the sauna has to respect location, temperature, support, and access, and the transition into the hot zone is where standard cable stops being acceptable.
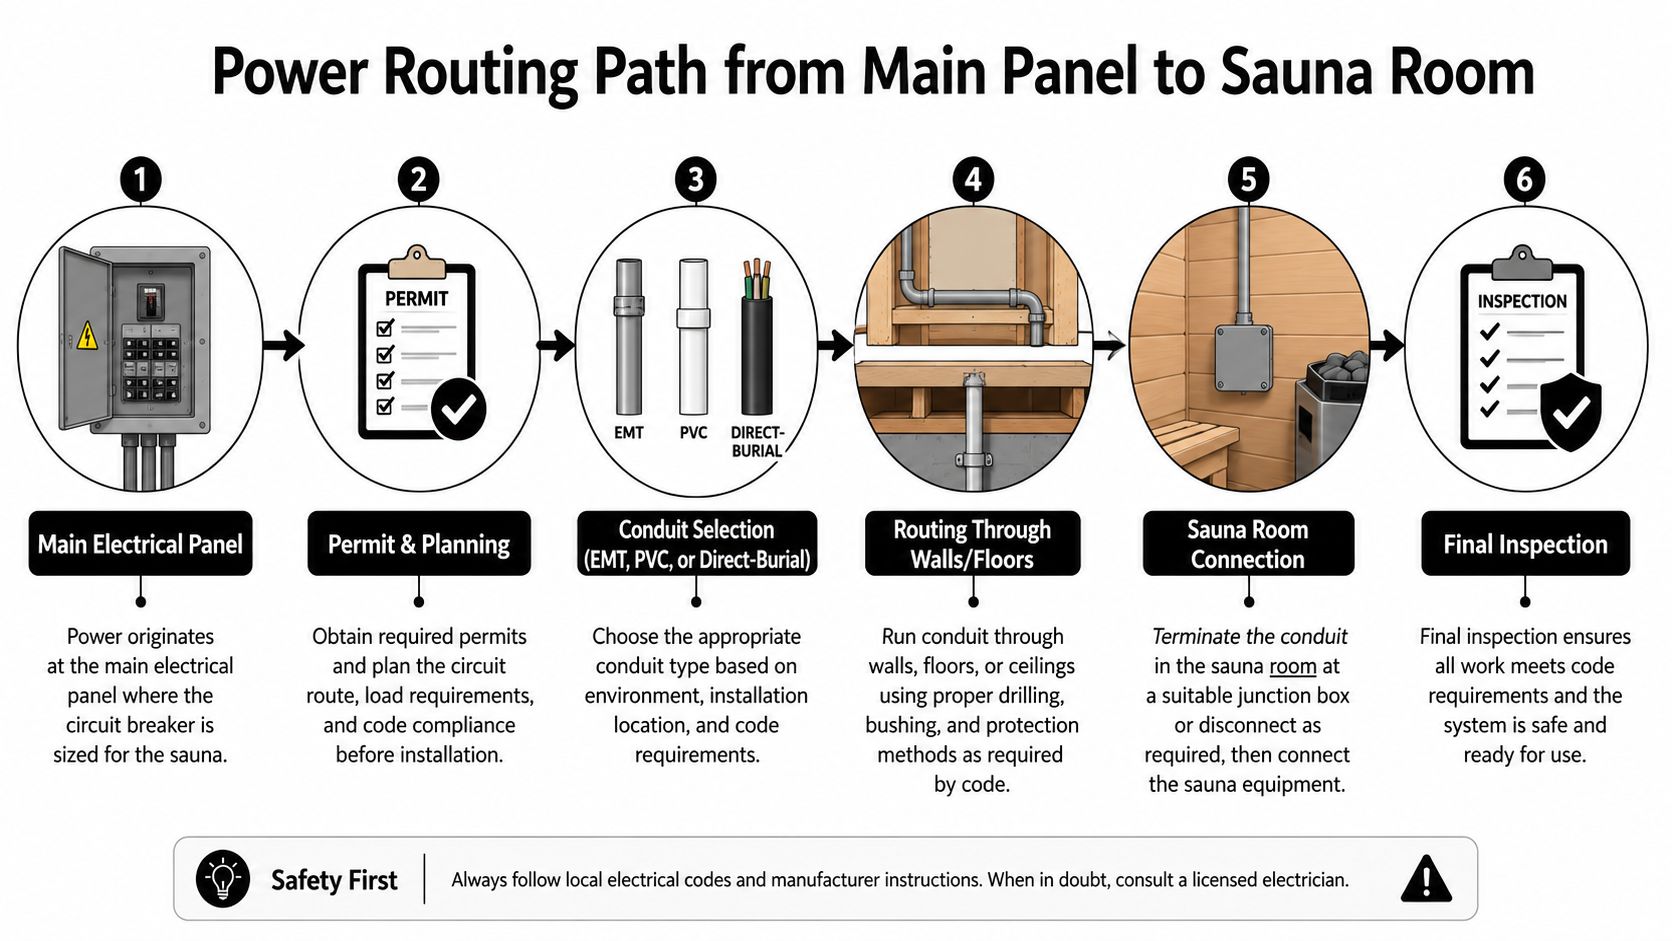
The path from panel to heater should be deliberate
A compliant rough-in usually starts with a permit and planning check, then conduit selection, then the route through walls, floors, or exterior space, and then the final connection at the sauna room. Depending on the location, EMT conduit, PVC, or direct-burial methods may be appropriate for the long run, but the visible disconnect and connection points still need to be accessible and code-compliant. If the sauna sits far from the main equipment, the panel capacity and route deserve just as much attention as the heater itself. For a broader look at how a service panel can be evaluated and expanded when a new load is added, expert advice on sub panel setup is a useful reference point.
A common mistake is trying to continue standard insulated cable into the hot room. That's the wrong material in the wrong place. The guidance for sauna installation is clear that PVC cable should stop outside the sauna, and the final run inside the high-heat zone should use heat-resistant silicone cable rated for the temperatures it will encounter. Junction points belong outside the sauna cavity, and every transition should be protected with proper strain relief and enclosure discipline.
What a clean rough-in looks like
The heater control unit is typically mounted outside the sauna room, and the final run to the heater is completed only after the hot-zone cable and terminations are in place. Splices inside the sauna cavity are a bad idea, because the environment works against them and service access becomes poor. A handyman can sometimes help with non-energized support work, but the actual 240V rough-in and termination belong to a pro when the route crosses panels, disconnects, or hot-zone transitions.
A job that looks neat on the wall but ignores the cable rating at the room entry is not a finished job. It's a code problem waiting to be found.
GFCI, Disconnects, and the Protection Stack
Once the circuit is sized, the next conversation is protection. Homeowners often hear GFCI, disconnect, and breaker used interchangeably, but they do different jobs. A breaker protects the branch circuit from overcurrent, a GFCI device trips on ground faults, and a local disconnect gives you a manual shutoff near the sauna for service and safety.
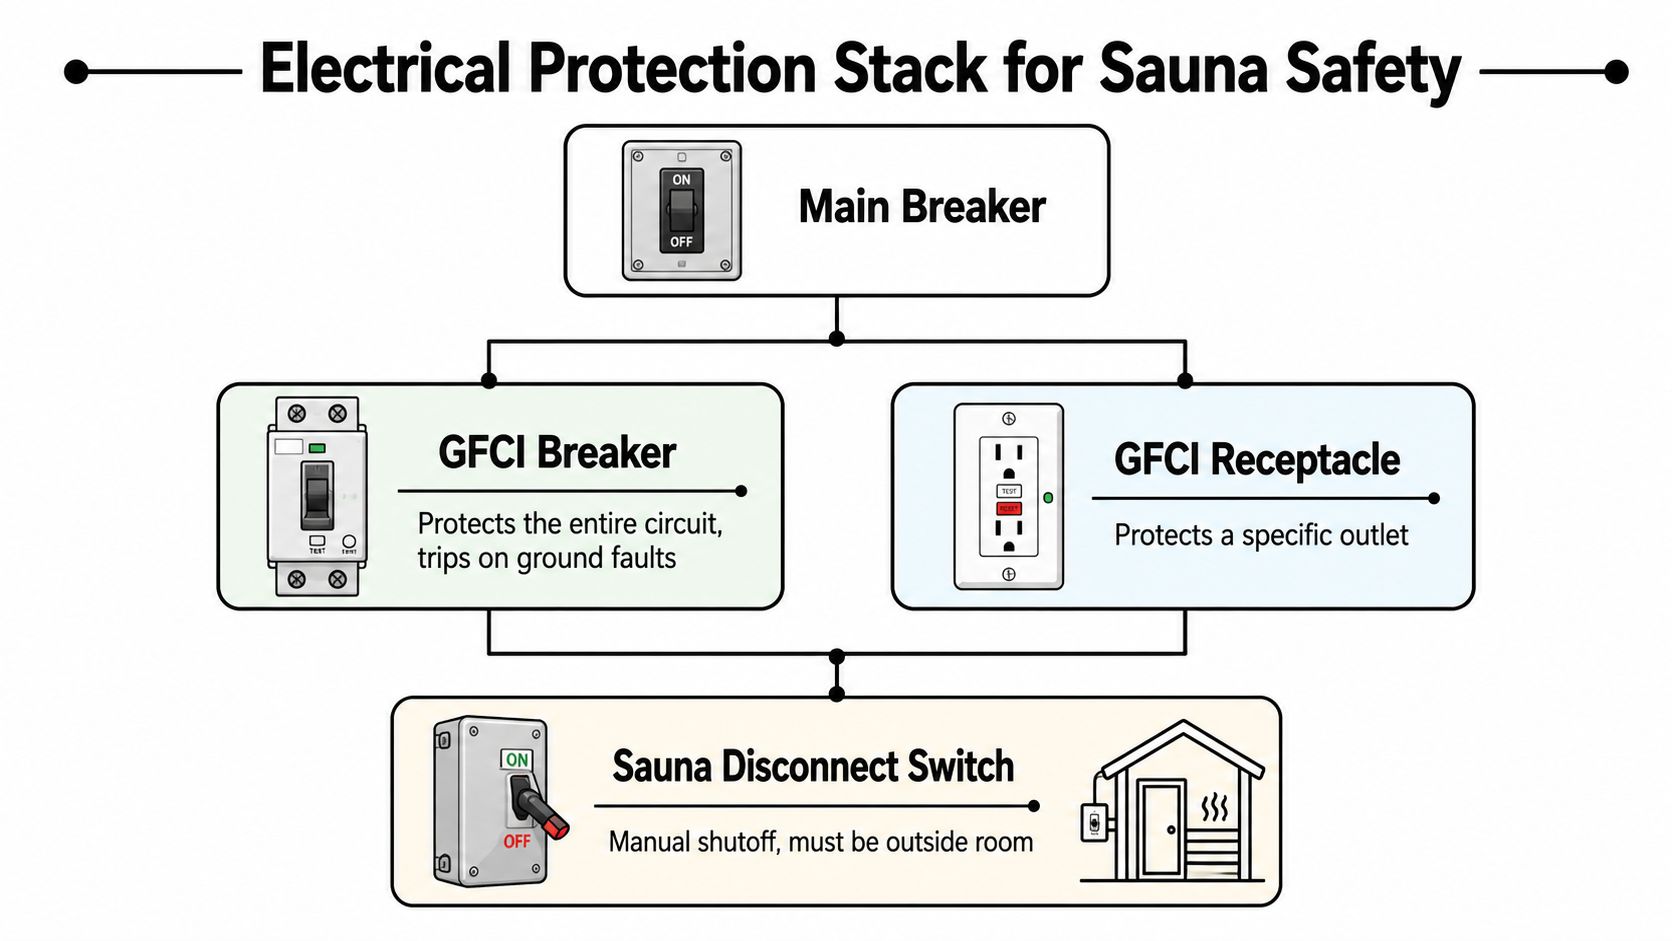
Breaker protection is not the same as GFCI protection
A GFCI breaker protects the entire circuit and trips if it senses a ground fault anywhere on that run. A GFCI receptacle protects a specific outlet, which is useful in many rooms but usually not the cleanest answer for a fixed sauna heater. For a permanent heater, many inspectors prefer the breaker form because it protects the whole branch and avoids leaving part of the run outside the protection zone. If you want the general principles of ground-fault protection before you talk to an inspector, the explanation in what is a ground fault circuit interrupter is a solid baseline.
The disconnect has to make sense in the room layout
The disconnect requirement is the other piece people skip. In many installs, the sauna needs a local means of disconnect within sight of the room, and the switch or breaker arrangement has to be convenient enough that service work can be done without hunting through the house panel. That disconnect may be fused or non-fused, depending on the design and jurisdiction, but the job is the same, give the technician a clear way to shut the heater down close to the equipment.
Practical rule: if you can't reach the disconnect quickly from the sauna area, the layout probably needs work.
Rules do vary. Some jurisdictions require GFCI for all residential saunas, others limit it by heater type or installation method, and the manufacturer's manual can control part of the answer. That's why the final protection stack should be chosen with the permit office, not guessed at from a general electrical article. In practice, the right combination is the one that gives the inspector a complete circuit, a valid shutdown point, and a protection device that matches the heater's wiring method.
Controls, Lighting, and Ventilation Wiring
A sauna that only heats is half a room. The controls, lighting, and ventilation all need to be planned together so the space works safely and doesn't leave you fumbling in the dark if a heater trips. The key idea is that the heater circuit and the comfort systems shouldn't all depend on one fragile branch.
Keep the controls out of the heat
Thermostats and timers are almost always mounted outside the sauna room, and that's not just for convenience. Low-voltage control wiring doesn't like heat, and the control box itself lasts longer when it's kept away from the hottest air. The heater's control terminals and external controller should be wired exactly as the manufacturer specifies, with the control cable routed where it's allowed to run and protected where it passes through walls or framing.
Lighting needs its own discipline too. A sauna fixture should be rated for sauna temperatures, mounted where it won't be touched or splashed, and fed from a circuit separate from the heater. If the heater breaker trips, you don't want the room blacked out while someone is still inside. That separation also makes troubleshooting much simpler when a light fails later.
Ventilation belongs in the electrical plan
Ventilation is part comfort, part safety, and part code sense. A simple switched exhaust fan on its own small branch circuit keeps air moving and gives the room a more stable feel during use. The fan circuit doesn't need to be complicated, but it should be intentional, because fresh air intake and exhaust affect how the sauna performs and how the electrical equipment around it behaves.
A good sauna room is usually built as a system. The heater is the biggest load, but the controls, light, and fan all have to work together without creating a shared failure point.
Good practice: separate the heater, lighting, and ventilation feeds whenever the layout allows it, then keep the control logic outside the hottest part of the room.
Permits, Inspections, and When You Must Hire a Licensed Electrician
The permit is the part people want to skip, and it's usually the part that causes the biggest mess if they do. In Florida and Palm Beach County, a new 240V sauna circuit is the kind of electrical work that belongs in the permit process, and the general industry guidance is consistent that code-compliant permitting and inspection aren't optional decorations on the job. Most jurisdictions require a permit for that kind of installation, and once a homeowner starts a circuit without one, the risk isn't just technical, it can affect insurance, resale, and the next inspector who opens the panel.
What inspectors actually look at
Inspection usually comes in two stages. The rough-in inspection happens before drywall or enclosure panels go up, so the inspector can see the cable route, box placement, conductor protection, and the disconnect arrangement. The final inspection follows after the heater, controls, and terminations are complete, and that's when the room is checked as an operating system. Inspectors care about the actual installation path, not just whether power turns on.
A licensed electrician should handle anything inside the panel, any new breaker, any new 240V branch circuit, and anything in a wet or hard-to-access location. Those are the exact places where a homeowner can make a dangerous mistake without realizing it. Mounting a light fixture or running low-voltage control wire may be within reach for some homeowners, but the line gets crossed fast once the work enters the service equipment or the dedicated heater feed.
For a homeowner trying to vet who should do the work, how to find a good electrician is worth reading before the first hole gets drilled.
Palm Beach County reality is simpler than the internet makes it
Local labor, scheduling, and permitting rules shape the job. Lighthouse Energy Services covers Palm Beach County with true 24/7 availability and no extra charge for after-hours calls, which matters when a project has to coordinate around inspection windows or a tight build schedule. The important part isn't a sales pitch, it's knowing that the electrician on a sauna job should be able to handle permit work, inspection corrections, and service-panel coordination without pushing the homeowner into guesswork.
Decision rule: if the task affects the service panel, the 240V branch circuit, or the inspection sign-off, treat it as licensed work.
That leaves the DIY-friendly pieces in their lane. Trim, fixture mounting, and some low-voltage control prep can be homeowner tasks, but the breaker, feed, and final energization should be handled by a licensed electrician who understands local permit expectations.
Your Sauna Electrical Project Checklist, Costs, and Timeline
A sauna electrical project goes smoother when the sequence is fixed before anyone opens the panel. The order matters because each step depends on the one before it, and skipping ahead usually creates rework. A straightforward job starts with the heater nameplate and ends with inspection sign-off, with the electrical work itself typically taking a day or two and the permit process adding its own wait time.
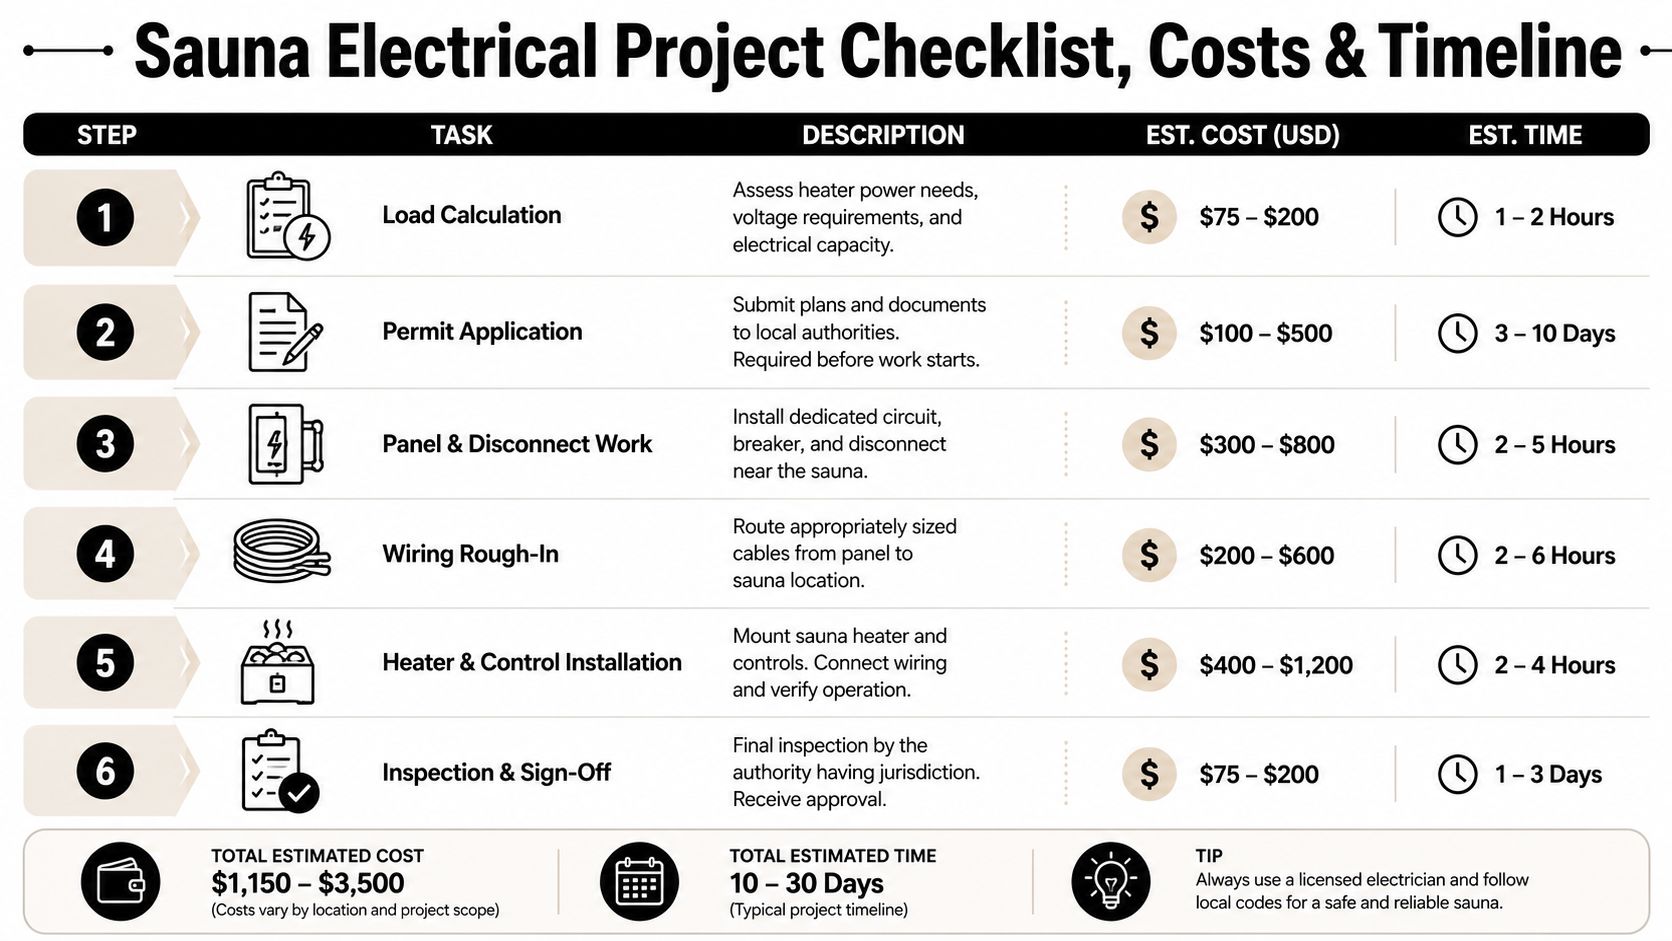
A practical project sequence
- Load calculation. Confirm the heater nameplate, voltage, and amperage before buying hardware.
- Permit application. File before work starts, especially for a new 240V circuit.
- Panel and disconnect work. Install the dedicated circuit and local shutoff.
- Wiring rough-in. Route the cable to the sauna location with the correct conduit or protection.
- Heater and control installation. Mount and connect the fixed equipment.
- Inspection and sign-off. Verify the installation and get it approved.
| Sauna Electrical Project Phases and Typical Effort | ||
|---|---|---|
| Phase | Typical Duration | Cost Driver |
| Load calculation and planning | Short planning task | Heater model complexity |
| Permit and inspection scheduling | Varies by jurisdiction | Local review timing |
| Panel and disconnect work | Usually a day or less on straightforward jobs | Panel access and breaker space |
| Rough-in wiring | Usually a day or less on straightforward jobs | Wire length and routing difficulty |
| Final heater and control connection | Usually a day or less | Hot-zone transition and finish work |
| Final inspection and commissioning | Short final visit | Correction items if any |
The cost side depends on the same three things over and over. A long wire run, a panel upgrade, or a difficult wall or foundation penetration can swing the budget more than the heater itself. For homeowners trying to gauge whether the existing service can handle the load, home electrical panel upgrade cost is a useful place to understand why panel work can change the whole project.
Day-of-commissioning checks
Before anyone uses the sauna, verify the thermostat cut-off, test the timer, and confirm the ground-fault protection behaves as expected. Those checks are not busywork. They're the last proof that the heater, controls, and protection devices were wired as a system and not just connected until something lit up.
Commissioning rule: if any safety function doesn't trip, time out, or shut down the way the manual describes, stop and correct it before first use.
If you're planning a sauna in Palm Beach County and want the wiring, permit, and inspection handled by a licensed crew that knows this load class well, contact Lighthouse Energy Services and ask for help with your sauna circuit, panel capacity, and code-compliant installation.