
The doorbell goes silent just when someone arrives, or the video unit works during the day and reboots overnight. You replace the button, reset the chime, and still get the same unreliable result. In many homes, the fault lies with the transformer, either because its output has fallen below the required level or because an older unit can't supply the load demanded by a modern connected doorbell.
Doorbell transformer replacement is more than a low-voltage hardware swap. The transformer has a low-voltage secondary side for the chime and doorbell, plus a concealed 120V primary side connected to household power. You need to identify both sides, select voltage and VA capacity for the equipment in place, and confirm that the junction box, wiring, grounding, and access meet local requirements.
Table of Contents
- Why Doorbell Transformer Replacement Is More Than a Simple Swap
- Safety Precautions Before You Touch the Transformer
- Identifying the Right Replacement Voltage and VA Rating
- Removing the Old Transformer and Wiring the New One
- Testing and Troubleshooting After the Swap
- Code and Compliance Considerations Most Homeowners Miss
- When to Call a Licensed Electrician for the Job
Why Doorbell Transformer Replacement Is More Than a Simple Swap
A mechanical chime that works intermittently, or a video doorbell that reboots when its camera activates, can point to the same fault: a transformer that no longer supplies stable power. Replacing it requires more than matching the shape of the old metal box. You must account for the low-voltage output, the transformer's VA capacity, and the household-power connection feeding it.
A traditional transformer steps line voltage down to a safer low-voltage supply for the button and chime. Residential replacement ratings commonly range from 10 to 24 volts, while smart doorbells generally require 16 to 24 volts. An output below 16 volts is also a practical sign that replacement may be needed. Home Depot's doorbell repair guidance explains the basic operating principle and the need to shut off power before disconnecting the old transformer.
The two circuits behind the cover
The secondary circuit carries low-voltage power to the chime, button, and connected doorbell. The primary circuit brings household line voltage into the transformer, often from a junction box near a furnace, in a ceiling, inside a closet, or close to the front door.
That primary side creates the serious electrical hazard. The low-voltage terminals may appear harmless, while the supply terminals can remain energized even when the doorbell is completely dead. A proper replacement therefore begins by tracing the line-voltage feed and confirming that it is de-energized, rather than relying on the doorbell's symptoms or a breaker label.
The existing transformer may also be undersized for the equipment now installed. A basic chime can run for years on an older unit, while a video doorbell demands steady operating power and additional capacity when its camera, wireless connection, or chime activates. Match the replacement's voltage and VA rating to the complete present load, not just to the old label.
Practical rule: Diagnose the transformer as part of the complete circuit, not as an isolated metal box beside the chime.
Safety Precautions Before You Touch the Transformer
Start at the transformer location, not at the doorbell button. Find the cable or conduit feeding the primary side and identify its breaker. It may share a lighting or equipment circuit, so don't assume the breaker label is accurate or that switching off a nearby light has made the transformer safe.
Turn off the breaker, and use a lockout or warning tag if other people could restore power while you're working. A non-contact tester can provide an initial indication, but it isn't proof of a dead circuit. Confirm with a properly rated multimeter at the transformer's primary terminals, testing between each line conductor and ground as appropriate for the installation.
Make the work area safe
Wear safety glasses and use insulated gloves suited to the task. Set a stable stepladder on a firm surface. Transformers are often mounted above HVAC equipment or near ductwork, where a chair or improvised platform can shift while you're reaching into a junction box.
Before disconnecting anything, photograph the installation from more than one angle. Make sure the images show the primary terminals, secondary terminals, cable entries, grounding conductors, and junction-box cover. If you're preparing for broader electrical work, this home electrical inspection checklist can also help you document the surrounding installation.
The order matters. Shut off the primary supply first, verify the absence of voltage, and only then handle the secondary wires. Don't rely on the fact that the chime has stopped ringing. An open low-voltage circuit doesn't prove that the 120V side is dead.
Know when access is the problem
A transformer mounted inside an accessible junction box is one situation. A unit buried behind finished drywall, resting above a hard ceiling, or surrounded by insulation is another. You may need to open a finished surface, install an access panel, correct an unsupported cable, or repair an enclosure before replacement is safe.
If you can't identify the supply, reach the junction box safely, or obtain a reliable meter reading, stop there. The correct next action is electrical diagnosis, not pulling harder on the old transformer.
Identifying the Right Replacement Voltage and VA Rating
Your old transformer may still show the correct output while failing as soon as a camera doorbell activates. Its label records the previous installation, not necessarily the load your current system places on it. Start with the connected devices, then select compatible voltage and enough volt-ampere, or VA, capacity to prevent voltage drop.
For most residential systems, the practical secondary target is 16 to 24 VAC. Traditional mechanical chimes commonly use 16 volts, while connected video doorbells often require 16 to 24 volts. Modern doorbell systems also commonly call for 30 VA or higher. Home Depot's transformer listings and guidance reflect the shift from basic chime transformers to higher-capacity units.
The primary side still matters. The transformer must be rated for the home's 120V supply, and the replacement must fit the existing junction box or approved mounting arrangement. Never select a transformer by its low-voltage label alone. A correct secondary output does not make an unsuitable 120V primary installation safe.
Compare the load before buying
| Setup | Recommended Voltage | Minimum VA | Typical VA Draw |
|---|---|---|---|
| Basic mechanical chime and button | 16 VAC | Match the chime label | Chime and button load only |
| Mechanical chime with one connected doorbell | 16 to 24 VAC | 30 VA where required by the device | Doorbell plus chime demand |
| Video doorbell with connected chime | 16 to 24 VAC | 30 VA or higher | Continuous device load plus activation demand |
| Multiple connected devices or accessories | 16 to 24 VAC | Size from the combined labels | Sum every device on the transformer |
The distinction between voltage and capacity determines whether the replacement will work. Voltage must match the doorbell and chime requirements. Capacity indicates how much power the transformer can provide while those devices operate. A transformer can measure correctly with no load, then sag when the camera, chime, or both demand power.
Don't use voltage as a substitute for VA
A 24V transformer is not automatically suitable. Applying 24 volts to equipment designed for 16 volts can damage a chime or its electronics, as Wayfair's transformer replacement guide cautions. Read the doorbell and chime specifications, add their VA demands, and choose the next suitable standard capacity.
If the combined demand exceeds one transformer's rating, use a separate transformer or redesign the circuit rather than forcing every device onto one supply. Matching the old transformer works only when the system is unchanged. A camera doorbell and electronic chime can turn an adequate mechanical-doorbell transformer into the source of repeated failures.
Removing the Old Transformer and Wiring the New One
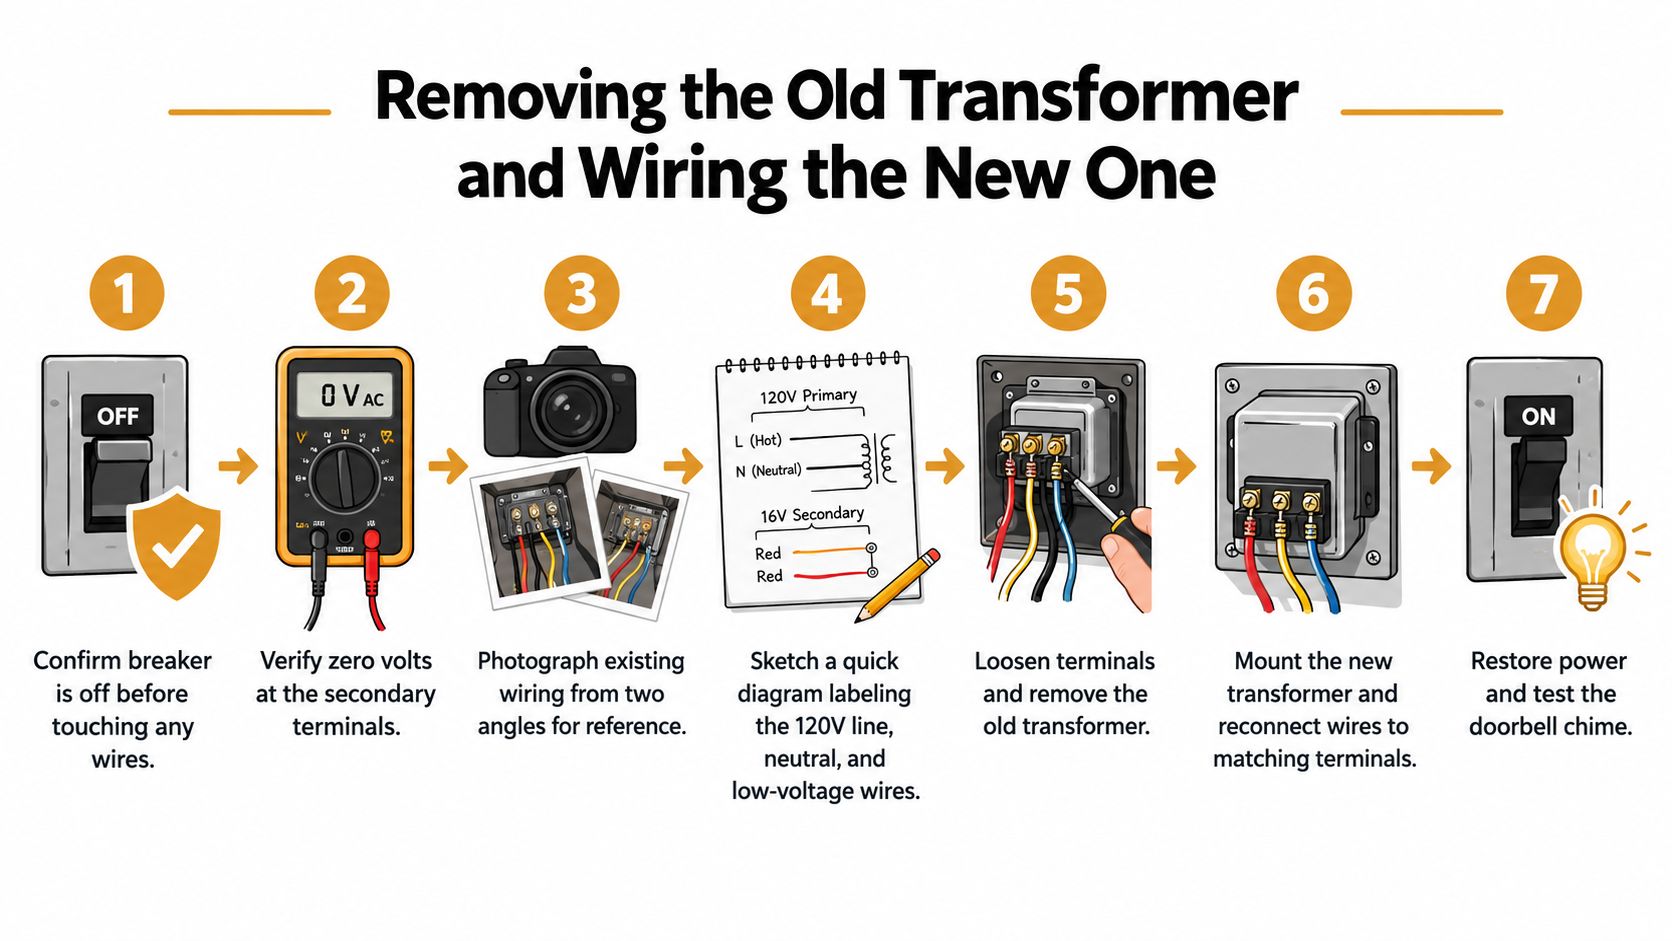
With the breaker off and the meter confirming zero voltage, photograph the existing wiring again before loosening a terminal. Draw a quick sketch that separates the 120V primary conductors from the thinner low-voltage secondary wires. Wire colors vary by installation, so terminal markings and your recorded diagram matter more than assumptions.
Disconnect and label before mounting
Loosen the old transformer terminals carefully. As each conductor comes off, cap and separate it with an approved wire connector so exposed conductors can't contact the box, one another, or a grounded surface. Label the low-voltage wires for their destinations if the existing markings aren't clear.
Remove the old mounting hardware and inspect the junction box. Look for heat discoloration, brittle insulation, loose cable connectors, missing grounding connections, or a box that moves when the transformer is handled. Those conditions aren't cosmetic. They can indicate that the installation needs repair before a new transformer is fitted.
Secure the new unit to a proper support
Mount the replacement transformer to a solid junction box or structural support. Don't fasten it to drywall alone. Use the included locknut or a listed connector for the box knockout, and make sure the cable entry is protected from sharp metal edges.
Land the primary conductors on the new transformer's line-voltage terminals. Connect the secondary wires to the low-voltage terminals marked for the required output, following the manufacturer's diagram and preserving the circuit arrangement shown in your notes. Keep the two sides physically organized and don't place low-voltage conductors under line-voltage terminals.
Tighten terminals securely without damaging the conductor. Fold the wiring into the box so no insulation is pinched, then reinstall the junction-box cover before restoring power. The cover protects the splice and keeps the enclosure compliant. If the new transformer doesn't fit the existing box or leaves the cover unable to close, don't improvise with exposed wiring.
Testing and Troubleshooting After the Swap
A smart doorbell may power up and still fail under load. Restore power only after the primary connections are enclosed and the transformer is firmly mounted. Measure AC voltage at the transformer's secondary terminals with the doorbell connected. Testing there first shows whether the problem begins at the transformer or develops along the low-voltage cable.
Standard troubleshooting practice checks transformer output first, then isolates primary-side power loss, damaged wiring, loose connections, and overload. A 16-volt transformer reading below 10 volts can indicate that the unit is unsuitable or failing. A reading of 0 volts with the breaker on points toward a primary-side fault, an open connection, or a defective transformer. Treat the primary side as live-voltage work, not doorbell wiring.
Use the meter to narrow the fault
| Measurement Point | Expected Reading | Symptom if Off | Corrective Action |
|---|---|---|---|
| Transformer secondary, unloaded | Transformer's rated AC output | Weak or absent output | Check the transformer, primary supply, and terminal connections |
| Transformer secondary under load | Close to the device-specific target | Reboots, weak chime, intermittent operation | Check VA capacity, overload, and transformer condition |
| Low-voltage conductors at the doorbell | Suitable voltage at the device | Doorbell fails while transformer tests correctly | Test wiring continuity and connections |
| Primary side with breaker on | Line voltage appropriate to the installation | Transformer has no output | Stop and investigate the supply circuit |
| Chime terminals during button operation | Operating voltage with a complete circuit | Buzzing, no chime, or weak activation | Isolate the button and inspect chime wiring |
Compare the unloaded and loaded secondary readings. A sharp drop when the smart doorbell connects can mean the transformer has enough voltage but insufficient VA capacity for the doorbell, chime, and any other connected load. If the transformer remains near its rated output while the doorbell receives much less, switch off power and test the low-voltage cable for continuity. A damaged conductor, loose splice, or corroded connection can create voltage drop that resembles transformer failure.
A chime that hums without ringing needs isolation. Disconnect one button wire, then briefly bridge the chime terminals only if that test matches the system's wiring design. If the chime operates, suspect the button or its cable. If it does not, inspect the chime and the transformer load. For an unexplained trip or suspected fault elsewhere, follow a structured guide to finding an electrical short in a house. Do not perform live tests beyond your training.
Code and Compliance Considerations Most Homeowners Miss
The low-voltage side makes a doorbell look harmless. The transformer's primary side is still connected to household power, and that distinction changes the job. Doorbell wiring is commonly treated as a Class 2 circuit under NEC Article 725, while the 120V supply and its enclosure remain subject to the applicable line-voltage wiring and installation rules.
A like-for-like replacement may still involve line-voltage conductors, a junction box, cable connectors, grounding, and an accessible enclosure. Local authorities may require a permit for new line-voltage splices, a junction-box addition, or a circuit extension. Requirements vary by jurisdiction, so check with the local authority having jurisdiction or ask a licensed electrician before beginning.
Accessibility is part of the installation
A transformer shouldn't be buried where nobody can inspect or replace it. Behind drywall, inside ductwork, or above a hard ceiling without an access panel, the location can turn a routine replacement into a correction of the installation itself.
The box must be suitable for the wiring method, and metal components need proper grounding and bonding. A cable entering a metal box also needs an appropriate listed connector. A loose knockout, missing clamp, damaged insulation, or unsupported cable isn't fixed by installing a newer transformer.
The primary side decides whether DIY ends
Pay attention to the conditions around the transformer:
- Overheated insulation or darkened terminals can indicate a loose connection or excessive load.
- An ungrounded or unusual cable system may require broader correction.
- Aluminum branch wiring or shared-neutral arrangements require careful identification and listed connection methods.
- A transformer with no accessible disconnect makes safe isolation uncertain.
The right question isn't only whether the replacement transformer fits. It's whether the complete line-voltage installation is safe, accessible, grounded, and permitted for the work being performed.
When to Call a Licensed Electrician for the Job
A homeowner can handle a straightforward replacement only when the primary supply is identifiable, the breaker can be safely isolated, the transformer is accessible, and the wiring and enclosure are in good condition. If any of those conditions is missing, the task has moved beyond a simple hardware change.
Call a licensed electrician when:
- The breaker can't be identified. You can't verify a dead primary circuit by assumption.
- The transformer is buried or inaccessible. Opening drywall or a fire-rated assembly can create repair and access obligations.
- The primary wiring shows heat or arcing. Discoloration, melted insulation, or a buzzing connection may signal a dangerous fault.
- Aluminum branch wiring is present. The connection requires components and methods listed for the conductor materials, not an improvised splice.
- The supply uses old, ungrounded, or unfamiliar wiring. The transformer may be only one part of a larger safety issue.
- The connected load exceeds the transformer's capacity. A higher-capacity or separate circuit may be needed instead of repeatedly replacing an undersized unit.
- You can't obtain reliable meter readings. Guessing on the primary side isn't a safe diagnostic method.
These rules align with the broader principle behind home projects to leave to pros. The risk isn't limited to connecting two low-voltage wires. It includes the supply, enclosure, cable entry, grounding, access, and the condition of the surrounding electrical system.
Make the service call useful
Tell the electrician where the transformer is located, what symptoms you're seeing, whether the system includes a connected video doorbell, and what the transformer label says. Send photos showing the box, cable entry, terminals, breaker panel labeling, and any heat damage. Mention whether the doorbell reboots, the chime buzzes, or the circuit breaker trips.
A contractor who provides guidance on finding a good electrician can help you evaluate the right qualifications for the job. For a buzzing transformer near HVAC equipment, insulation, or a ceiling cavity, don't wait for a complete failure. Lighthouse Energy Services offers residential electrical repairs, transformer replacement, and emergency troubleshooting with 24/7 availability, including situations where the primary-side condition needs immediate attention.
Lighthouse Energy Services can inspect the primary and secondary sides, select a transformer matched to your doorbell load, and complete the replacement with attention to access, grounding, and local electrical requirements. If your doorbell is silent, buzzing, rebooting, or connected to an inaccessible transformer, contact Lighthouse Energy Services to arrange a safe diagnosis and repair.