
You can pick the prettiest pendants in the showroom, but if the wiring in the wall can't support them, the remodel still stalls. That's the part homeowners feel in their gut once the boxes are open, the ceiling is exposed, and the electrician starts pointing to circuit capacity, box depth, or a fixture that landed in the wrong spot after the cabinets got finalized. In kitchen and bathroom lighting remodel electrical work, the visible part is the last thing that matters. The hidden part, circuit mapping, moisture protection, and rough-in timing, is what decides whether the job passes inspection or turns into expensive rework.
Table of Contents
- Why Electrical Planning Must Come Before Fixture Shopping
- Circuit and Load Planning for Kitchen and Bathroom Remodels
- Safety Codes and Wet Location Requirements You Cannot Ignore
- Choosing Fixtures, Dimmers, LED Drivers, and Ventilation Controls
- Rough-In to Finish Installation Sequence and Inspection Checkpoints
- Budgeting, Permits, Timelines, and Hiring a Licensed Electrician
Why Electrical Planning Must Come Before Fixture Shopping
A homeowner picks out a row of slim pendant lights, orders the backsplash, and tells the cabinet installer to center everything around the island. Then the electrician opens the ceiling and finds the existing box is not where the new layout needs it, the switch leg does not match the revised plan, and the old circuit was never meant to carry the updated load. That kind of surprise burns time and money before a single trim piece goes on.
The fix starts on paper, not in the showroom. Before anyone buys fixtures, the room needs a clear electrical map that shows every fixture, switch, outlet, and appliance location before walls close. An electrician works from wire paths, box depth, and access points, not from the fixture photo the homeowner saved on a phone.
Practical rule: if the location changes wire routing, box placement, or future access, it needs to be decided before the wall gets closed.
That planning step matters because lighting is only one part of the system. In kitchens, circuits are tied to countertops, appliances, and general lighting at the same time, which is why a remodel often turns into a wiring redesign instead of a simple fixture swap. Bathroom work has its own trap, especially around moisture zones and fixture ratings, so a quick check of IP ratings for bathroom downlights can prevent a fixture choice that looks right but fails the room's conditions.
Spend on infrastructure before finishes
A useful budgeting rule from lighting specialists is to set aside a meaningful portion of the construction budget for electrical work and fixtures, then spend it on the layers that make the room function, ambient, task, and accent. That order keeps the project grounded in function first. A beautiful light over the island means very little if the switch lands behind a cabinet door or the circuit needs to be split after the tile is already set.
Homeowners usually waste money in the same places. They move switches after finish work, add under-cabinet runs too late, or correct outlet alignment after the cabinets are installed. Those changes are painful because the wall is no longer open. The electrician can usually solve the problem, but the solution is slower and more invasive than getting the layout right before rough-in.
Box depth is another detail that gets missed until the last minute. Some fixtures and controls need more room in the ceiling or wall than people expect, and tight framing can force a box change, a new mounting method, or a different fixture choice altogether. If the layout is being pushed into an older service, the discussion should include capacity early, and a home electrical panel upgrade cost guide can help frame that conversation before the design is locked in.
The right sequence is simple. Map the room, confirm the load, check moisture exposure, and only then choose the fixtures that fit the wiring plan already on the page.
Circuit and Load Planning for Kitchen and Bathroom Remodels
A kitchen or bathroom remodel can look simple on paper, then fall apart once the wiring gets mapped. Fixtures, receptacles, fans, heated accessories, and appliances all compete for space on the same service, and the hidden decisions have to happen before drywall closes. In the field, I start with the circuit map, the likely load, the box depth, and the moisture exposure, because that is what determines whether the room passes inspection or needs rework later.
Kitchens usually end up needing several dedicated circuits once you account for the refrigerator, microwave, dishwasher, disposal, countertop receptacles, and lighting. The exact count depends on the layout and appliance package, but the load rarely stays simple for long. Older service equipment can run out of room quickly, so the panel question has to be part of the electrical plan, not an afterthought. A home electrical panel upgrade cost guide is useful when the existing panel is already crowded and the remodel adds more demand.
How electricians think about circuit counts
Start with what the room must do, then assign the wiring. Under-cabinet LEDs, recessed lights, pendant lights, the refrigerator, microwave, dishwasher, disposal, countertop receptacles, vanity lights, the bath fan, and heated accessories all pull in different directions. A single circuit can only carry so much practical load before the layout becomes awkward or the inspector starts asking questions.
A small lighting update can still trigger a circuit change if the existing branch is already busy. On many remodels, I separate general lighting from appliance-heavy runs so the room is easier to service and easier to troubleshoot later. The goal is not to pack everything onto one breaker just because the old layout got by with it.
When 20-amp wiring starts making sense
Bathrooms often benefit from 20-amp circuits when the remodel replaces older 15-amp wiring, especially in rooms where hair dryers or heated accessories are part of normal use. That choice gives the room more breathing room without forcing the lighting, fan, and receptacles onto an undersized path. It also reduces the chances that a good-looking finish job hides an electrical shortcut.
Service capacity still has to be checked against the new plan. If the panel has spare space and the load stays reasonable, redistribution may be enough. If the new layout keeps adding dedicated loads or the panel is already full, the panel discussion should happen early, before tile, cabinets, and trim lock everything in place. For that part of the job, it helps to compare the existing panel conditions with the broader upgrade guidance in this home electrical panel upgrade cost guide.
A related planning step is deciding how lighting and ventilation should share the room. In a tight cooking area, it helps to compare commercial ventilation system designs before assuming one fan location will handle every airflow problem. The same rule applies in homes, different devices need different wiring paths, different controls, and enough service capacity to support them without crowding the rest of the remodel.
Safety Codes and Wet Location Requirements You Cannot Ignore
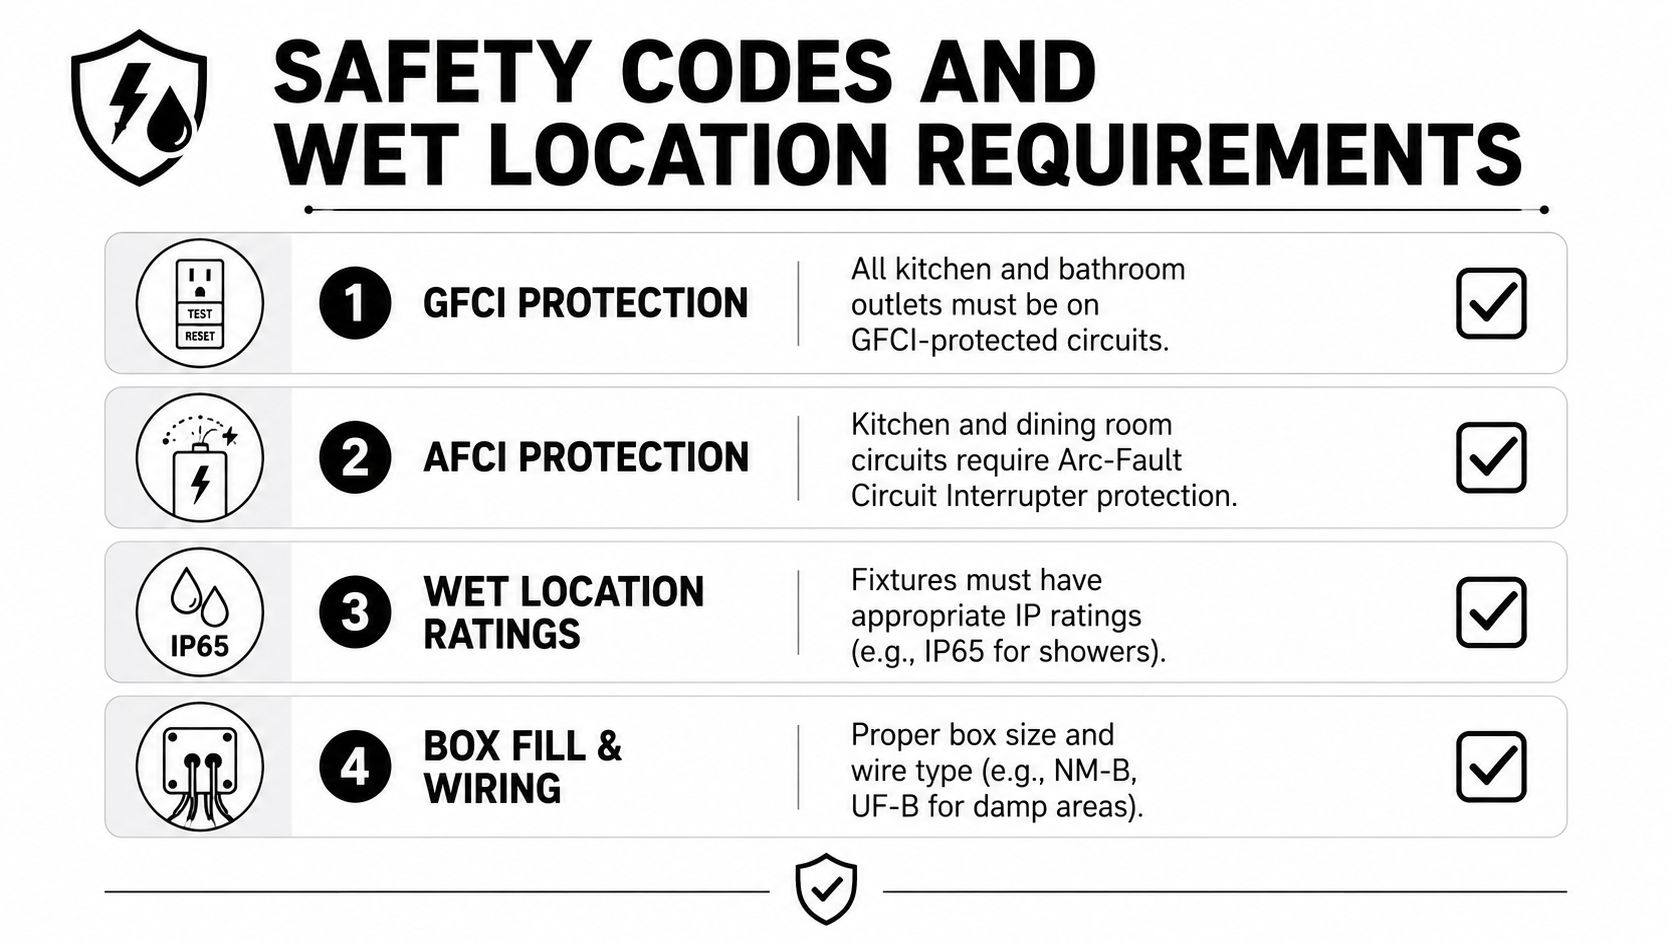
The safety rules in kitchens and bathrooms aren't there to slow down the remodel, they're there because water and electricity don't forgive shortcuts. Near sinks, tubs, showers, and damp corners, the failure points are predictable, and inspectors know exactly where to look. That's why the wiring plan has to be built around moisture exposure from the start.
GFCI, AFCI, and the limits of visual guessing
In wet and damp areas, GFCI protection is a core requirement because it reduces shock risk where water exposure is plausible. Kitchen and bathroom receptacles near water sources are the places most likely to be scrutinized. For a plain-language overview of why that device matters, see this ground fault circuit interrupter explanation.
AFCI protection also matters in many residential circuits, especially where wiring changes are being made during a remodel. The point is not to memorize acronyms. The point is to know that the circuit design has to match current safety expectations before the wall gets closed.
Wet-rated and damp-rated are not interchangeable
One of the biggest bathroom mistakes is assuming any attractive fixture can be used near a shower if it looks sealed enough. That's not how it works. Wet-rated fixtures are built for direct moisture exposure, while damp-rated fixtures are meant for humidity without direct spray. The difference matters most in showers and splash zones, where fixture placement and rating have to line up.
The fixture has to fit the zone, not the mood board.
Bathroom lighting in strict safety-zone jurisdictions can require licensed electrical work because the zone layout itself affects the allowable fixture type, box location, and protection method. Junction boxes near splash areas also need proper protection, because exposed moisture finds weak points fast. That's why the right question is not “can this fixture be adapted,” it's “is this fixture rated for this placement?”
Fan and light systems need a rough-in plan
Ventilation and lighting often get treated like separate trades, but they're joined at the rough-in. Bathroom wiring guidance emphasizes proper ducting to the exterior for fan and light combinations, because electrical work and air movement have to function together. If the fan is undersized, misrouted, or left to sort itself out later, the finished room may still pass visually while performing badly every day.
For homeowners who want to understand why protection in the bath is so essential, it helps to review a code-focused overview like the earlier section on GFCI and wet locations, then make sure the electrician is planning around the actual moisture zones, not just the center of the room.
Choosing Fixtures, Dimmers, LED Drivers, and Ventilation Controls
Once the wiring plan is set, the fixture choices start to matter in a practical way. A room with good infrastructure can still feel wrong if the lights glare, the dimmer flickers, or the vanity fixture throws shadows where the mirror needs clarity. The goal is not to buy the fanciest components, it is to match each device to the space it serves.
Match fixture type to the task
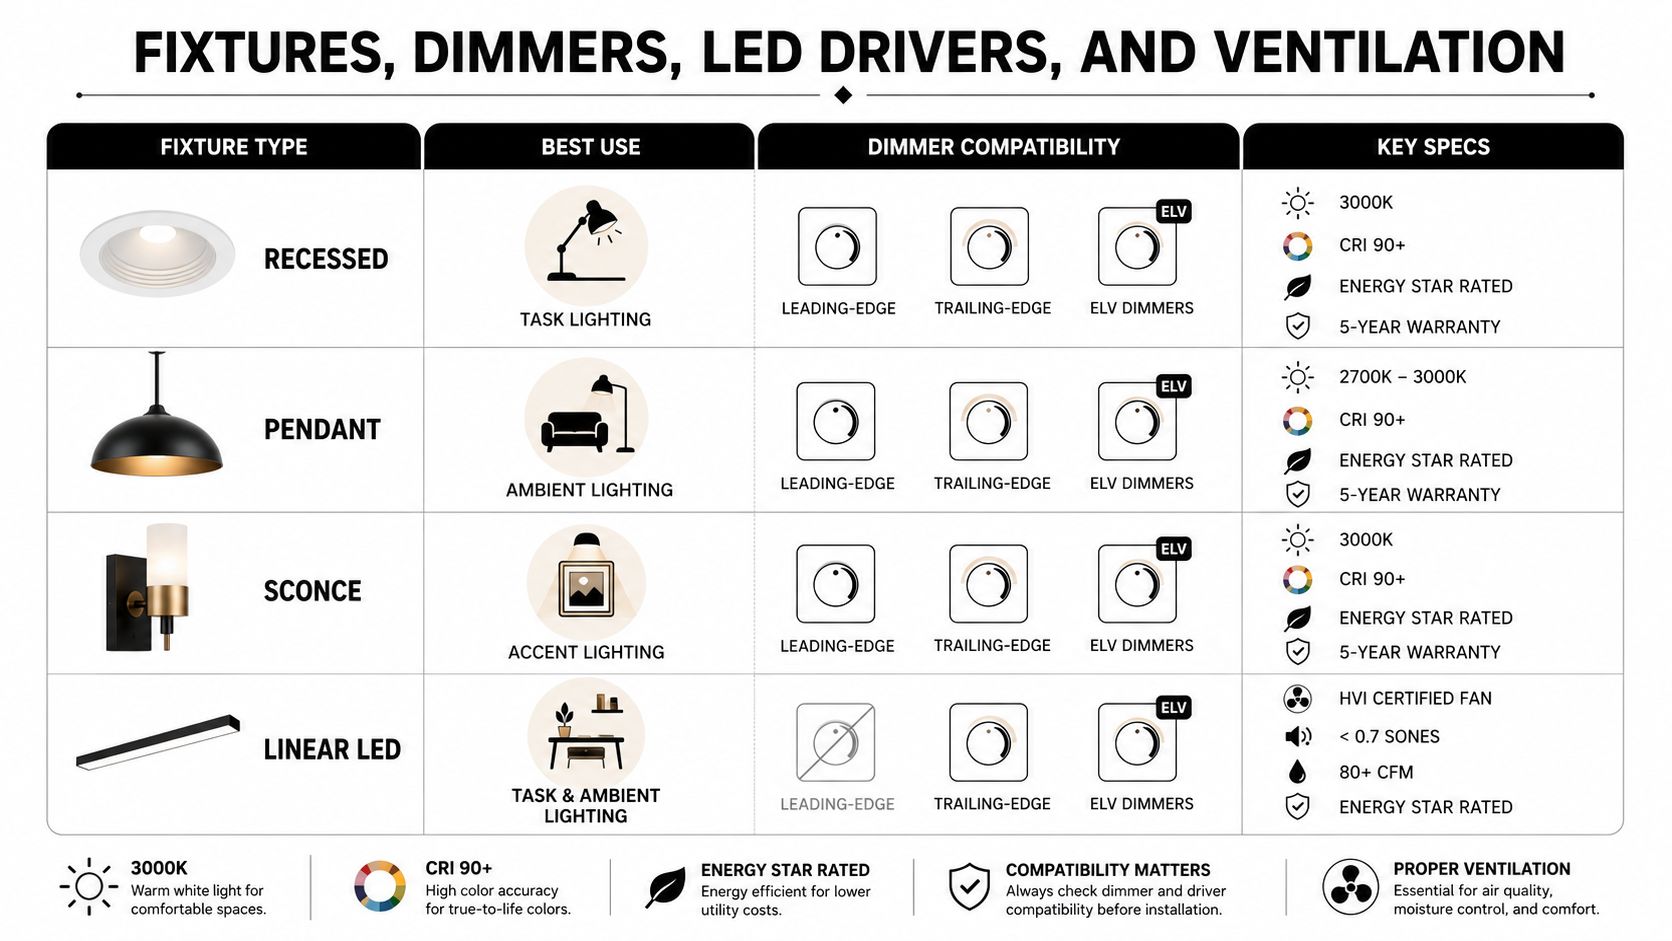
Recessed lights work well for general ambient light, pendants help define islands and eating areas, sconces give better side illumination at mirrors, and linear LED strips are strong for under-cabinet task light. Kitchens usually need all three layers, ambient, task, and accent, because countertop work and social lighting happen in the same room. Bathrooms benefit from the same layered logic, but vanity placement and moisture protection carry more weight.
That planning also affects the rough-in behind the finish. Box depth, cabinet clearances, and fixture body size have to be checked before drywall goes up, or the trim-out becomes a patch job. A homeowner who wants a cleaner under-cabinet run can review under cabinet lighting installation before cabinets are closed in, then coordinate the layout with the electrician and the cabinet installer.
Color temperature matters too. Cooler light can feel harsh in a kitchen if the room already has bright surfaces, while warmer light can flatten task areas if the countertop is the primary work zone. The right choice depends on what the room is doing most of the time, not on the catalog photo.
Dimmers and LED drivers need to agree
A dimmer that works with incandescent fixtures can behave badly with LEDs if the driver and control are not matched. Flicker, buzz, and uneven dimming usually are not bad lights, they are compatibility problems. That is why LED driver quality matters as much as the fixture shape.
Good trim-out starts with compatibility, not guesswork.
If the LED driver, dimmer, and load type do not line up, the room will remind you every night.
Smart switches and occupancy sensors can still fit into a traditional remodel, but they have to be selected with the circuit plan in mind. The electrician has to know whether the fixture wants forward-phase, reverse-phase, or ELV-style control before the walls close. Otherwise, the homeowner ends up swapping devices after the tile and paint are already done.
Ventilation controls should feel intentional
Bathroom fan controls are part of the lighting experience, not an afterthought. A fan that comes on too aggressively, too weakly, or on the wrong switch confuses the room's use pattern. The best installations keep the lighting control clear and the ventilation control easy to understand, which is especially helpful in shared bathrooms where multiple people use the space differently.
One practical note, if a homeowner is trying to coordinate a kitchen or bath remodel with a full electrical update, a local contractor like Lighthouse Energy Services can handle the lighting, device, and panel-side coordination in one scope instead of splitting the work across multiple hands.
A final check before trim-out saves money later. I keep a simple home electrical inspection checklist handy because box fill, device location, and switching logic are much easier to correct while the walls are open than after tile, paint, and cabinets are finished.
Rough-In to Finish Installation Sequence and Inspection Checkpoints
The cleanest remodels follow the same sequence every time, rough-in, verify, inspect, close the wall, then finish. Bathrooms are especially unforgiving because box depth, waterproofing, and ventilation all have to land correctly before tile and paint lock the room in place. If the order changes, the rework usually shows up later, when it's most expensive.
The order that keeps rework down
Bathroom wiring guidance puts the sequence plainly, rough-in wiring, box-depth verification, grounding, GFCI protection, inspection, then final fixture installation and testing. That order works because each step depends on the one before it. The box can't be buried too shallow or too deep once tile thickness is known, and the wiring can't be hidden before it's checked.
The same logic applies in kitchens, but with more branches. Appliance circuits, countertop receptacles, and under-cabinet lighting all need to be coordinated while the wall is still open. The electrician should know where cabinets end, where lighting starts, and where access remains possible after the trim-out.
What inspectors usually want to see
A local cover inspection after rough-in is one of the smartest checkpoints in a bathroom remodel. It confirms the wiring is set correctly before the drywall or tile closes everything in. It's also the moment when a missed box depth or misplaced run can still be corrected without tearing out finished surfaces.
Here's the part homeowners forget:
- Box depth must reflect finish thickness: Tile and drywall change the final face of the wall, so the box has to be set with the finish materials in mind.
- Lighting and fan circuits shouldn't be crowded together: Shared undersized circuits are a common cause of overload and rework.
- Wet-area protection has to be built in early: Waiting until trim-out to worry about moisture ratings is too late.
For a practical checklist before devices go on the wall, this home electrical inspection checklist is useful context for what should already be verified before finish day.
Under-cabinet runs need foresight
Kitchen lighting often gets complicated when under-cabinet work is added late. A straightforward installation can turn into a chase for hidden routing space if the cabinets, backsplash, and receptacle locations are already locked in. For homeowners planning that part of the job, under cabinet lighting installation is a helpful reference point for why early layout decisions matter.
Budgeting, Permits, Timelines, and Hiring a Licensed Electrician
The budget for a lighting remodel is never just the price of fixtures. It also covers circuits, boxes, switches, device compatibility, permits, and the time it takes to get the work inspected in the right order. The cheapest bid often leaves out the invisible pieces, and those are the ones that control whether the job finishes cleanly.
What drives the cost conversation
Kitchen work usually costs more than people expect because it touches more electrical systems. Bathroom work can look smaller on paper but still demand careful protection, especially around wet zones and fan wiring. The price moves with panel condition, fixture count, box relocation, circuit additions, and whether walls are open or already finished.
A good bid should separate labor for rough-in, trim-out, and any service work needed at the panel. If a contractor waves away panel capacity or says the room can “share what's already there,” that's a sign the electrical side wasn't properly scoped. In remodels, incomplete scoping is how a cheap quote becomes an expensive correction.
Permits and timelines deserve real attention
In Palm Beach County, the permit and inspection path matters because electrical work has to be documented before the walls disappear. The timeline usually slows when the plan changes midstream, the panel needs attention, or the rough-in inspection is delayed. The fastest projects are the ones where the layout, fixture list, and circuit map were settled early.
A homeowner hiring an electrician should ask direct questions. Is the contractor licensed for the scope? Who pulls the permit? What gets inspected before drywall, and what gets tested at the end? If the answers are vague, the risk usually shows up in the field later.
What to verify before you sign
Look for straightforward documentation, not sales language. The electrician should be able to explain the circuit plan, the wet-area protection, the box-depth strategy, and the sequence from rough-in to final test. If they can't, they're guessing at the exact stage where guessing is expensive.
Hire for the wall you can't see.
The visible fixture is the easy part. The hidden wiring, box placement, and inspection readiness are what make the remodel last.
DIY has a place in home ownership, but lighting remodel electrical work around kitchens and bathrooms usually crosses into professional territory fast. A homeowner can plan the room, but licensed work is the safer, smarter move once circuits, wet zones, and permit checks are involved.
If you're planning a kitchen or bathroom lighting remodel in Palm Beach County, Lighthouse Energy Services can help with the electrical planning, rough-in coordination, panel-side questions, and inspection-ready installation that keep the project moving. Visit Lighthouse Energy Services to talk through your layout before the walls close and the expensive fixes begin.